Side Bangs: How to Choose, Style, and Maintain the Right Variation
Compare side-bang styles by length, texture, upkeep, and grow-out. Learn what to ask your stylist and how to style each variation.
Side bangs can work with most hair lengths, textures, and face shapes. Face shape is not an eligibility rule. Choose the coverage and endpoint around what you want to emphasize, how your front hairline naturally grows, and how much daily styling you want to do.
Brow-length bangs create a more defined fringe, cheekbone-length pieces draw attention toward the eyes and cheeks, and longer versions blend more easily into layers. Start with your natural part and dry hair behavior, then choose the length and fullness that suit the effect you want.
What side bangs look like
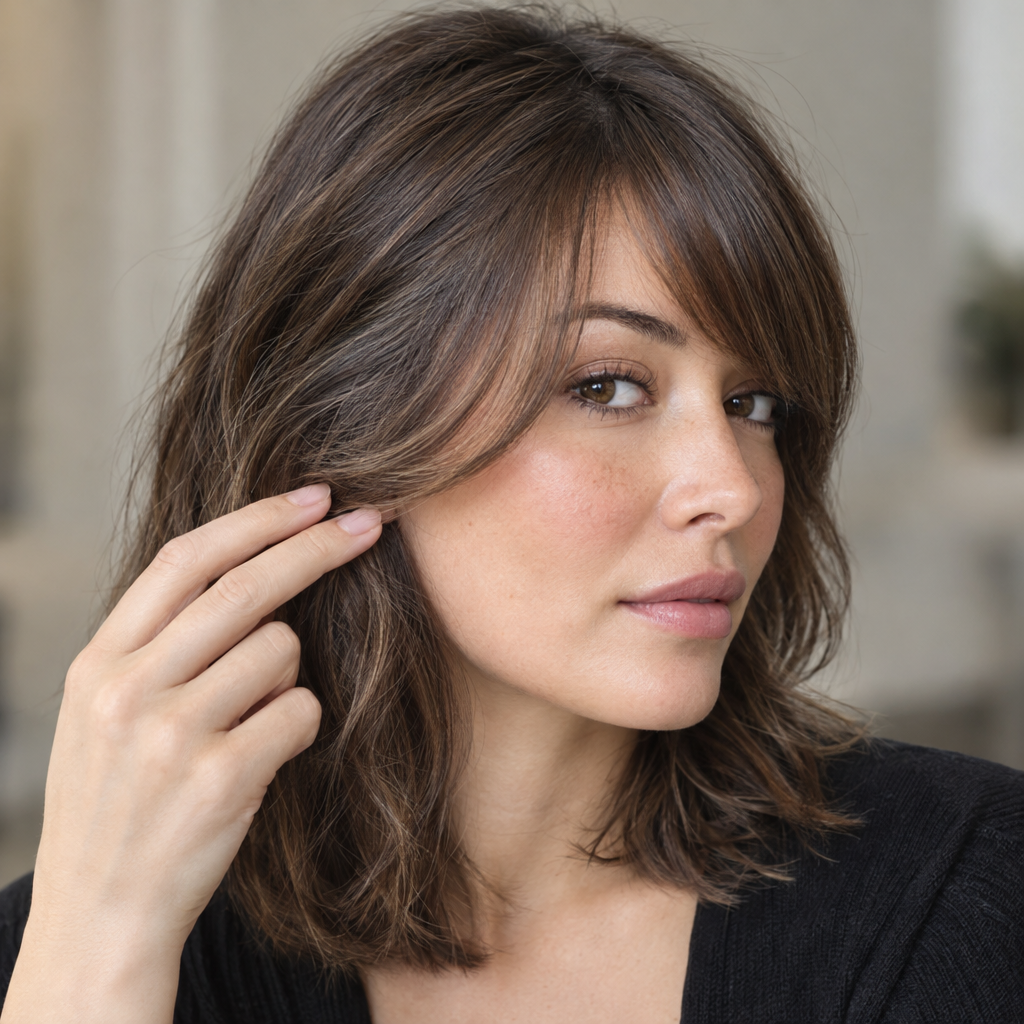
Side bangs are a deliberately cut fringe that crosses part of the forehead or angles toward one side. They usually have a shorter starting point and a longer outer edge, although directional styling also helps create the sweep.
“Side bangs,” “side fringe,” and “side-swept bangs” often describe overlapping looks. Side-swept usually emphasizes the direction of the hair rather than a separate cutting technique. It does not necessarily mean a deep part or dense fringe.
| Style | Defining feature | Main distinction |
|---|---|---|
| Side bangs | Fringe directed toward one side | Angled or swept forehead coverage |
| Straight-across bangs | Mostly horizontal front edge | More even forehead coverage |
| Face-framing layers | Graduated pieces beside the face | Usually less forehead coverage |
Long side bangs can merge into face-framing layers, so the boundary is not always clear. A reference photo communicates that transition better than a style name alone.
These choices change the way hair frames your features, not your facial structure.
Six side-bang variations and their trade-offs
Length, density, and direction are separate decisions. A fringe can be both wispy and cheekbone-length, for example. Compare the combinations rather than treating each style name as a fixed category. If you’re exploring different side-bang variations or considering a hairstyle that complements your preferred fringe, Facefy’s Hairstyle Finder can help you discover hairstyle ideas to compare before visiting your stylist.
Daily styling effort depends on the tasks your fringe requires, not a universal number of minutes:
- Low effort: Guiding the fringe into place while it air-dries or during your normal drying routine.
- Moderate effort: Dampening and resetting the roots after washing or sleeping.
- High effort: Resetting the roots, shaping the lengths with a brush or hot tool, and making occasional touch-ups.
A natural part or cowlick can raise the effort required for any variation, particularly if you want the fringe to fall against its usual direction.
| Variation | Typical endpoint | Coverage | Likely styling effort | Grow-out |
|---|---|---|---|---|
| Short and defined | Brow | Moderate to full | Moderate to high | Changes quickly as the edge grows |
| Soft and wispy | Brow to outer eye | Light | Low to moderate | Gradual loss of definition |
| Outer-eye length | Outer-eye area | Moderate | Moderate | May pass through an eye-level stage |
| Cheekbone-length | Cheekbone | Light to moderate | Low to moderate | Blends smoothly into front layers |
| Long and blended | Jaw | Light | Usually low | Most forgiving transition |
| Deep side-swept fringe | Outer eye to cheekbone or jaw | Moderate to full | Moderate to high | Becomes heavier as it lengthens |
Density needs to be adjusted carefully. Fine or lightly distributed hair can become too sparse if it is heavily texturized, while dense sections may need selective weight removal to create movement. Aggressive thinning can produce short pieces that lift, separate, or become difficult to control, so the goal is workable movement rather than removing as much hair as possible.
1. Short and defined
- Typical endpoint: Around the brow, with a longer outer edge.
- Visual effect: A clear fringe outline with some forehead exposed.
- Daily styling: Often needs damp-root direction-setting after sleep.
- Grow-out: Small changes quickly alter the outline and eye clearance.
- Tying hair back: Usually needs a clip or pin.
This is a useful choice if you want the bangs to remain a distinct part of the cut. It offers less flexibility if you prefer to sweep every front piece into a ponytail.
2. Soft and wispy
- Typical endpoint: Brow to outer-eye area, with separated, tapered ends.
- Visual effect: Light coverage with the forehead visible between pieces.
- Daily styling: Light shaping; avoid heavy creams near the roots.
- Grow-out: The soft edge becomes less defined gradually.
- Tying hair back: Short pieces generally need pinning.
Wispy describes the visual finish, not the amount of thinning required. The effect can come from a smaller section, tapered ends, or natural separation between strands.
3. Outer-eye length
- Typical endpoint: The longer edge reaches the outer-eye area.
- Visual effect: A noticeable sweep that draws attention toward the eyes.
- Daily styling: Needs a reliable sideways direction for eye clearance.
- Grow-out: Can pass through an awkward, eye-level stage.
- Tying hair back: Usually easier to pin than tie.
Choose this length with particular attention to your growth pattern. Pieces that sit comfortably when freshly styled may drift inward as the roots relax.
4. Cheekbone-length
- Typical endpoint: Around the cheekbone when dry.
- Visual effect: Frames the eye and cheek area with a longer sweep.
- Daily styling: Often benefits from a gentle bend or natural wave.
- Grow-out: Usually transitions smoothly into front layers.
- Tying hair back: Often pinnable or tuckable; ponytail reach varies.
This is a useful middle ground if you want visible framing without maintaining a short fringe edge.
5. Long and blended
- Typical endpoint: Around the jaw, gradually joining longer layers.
- Visual effect: Subtle framing rather than strong forehead coverage.
- Daily styling: Can be minimal if the natural bend cooperates.
- Grow-out: Generally the most forgiving transition into layers.
- Tying hair back: Often easier, depending on ponytail position.
Jaw-length pieces will not necessarily reach a high ponytail. Check the arrangement you actually wear rather than assuming “long bangs” means everything will tie back.
6. Deep side-swept fringe
- Typical endpoint: Outer-eye to cheekbone, sometimes extending toward the jaw.
- Visual effect: A broad sweep with stronger directional movement.
- Daily styling: More involved if it opposes the natural part.
- Grow-out: Gains weight and coverage as the fringe lengthens.
- Tying hair back: Longer pieces may reach; shorter ones need pins.
Here, “deep” describes a farther-over side part and broader sweep. It does not automatically require taking a thick section from far back on the head.
How endpoint length changes the effect
Specify where you want the bangs to land when dry and at rest, not when pulled straight. These four landmarks make the conversation more precise:
- Brow: Creates a recognizable bang and exposes part of the forehead on the opposite side. It usually needs regular direction-setting. As it grows, the shorter edge can begin touching the eyelashes.
- Outer-eye area: Makes the diagonal sweep prominent and emphasizes the eyes. The ends should travel beside the eye rather than hang across the line of sight.
- Cheekbone: Draws attention toward the upper cheeks and begins to connect with front layers. A strong inward bend can still bring these pieces across the eyes.
- Jaw: Creates longer, subtler framing and blends readily into layered hair. It is often easier to secure, although the shortest connecting pieces may remain loose.
The endpoint is only part of the effect. A dense brow-length fringe covers more forehead than a wispy one at the same length. Likewise, cheekbone-length hair can sit close to the face or sweep outward depending on the cut and styling.
Waves and curls can sit noticeably higher after drying. Ask your stylist to assess the relaxed dry position before settling on the final length.
Choose side bangs by hair behavior and visual goal
A fringe that works with the front hairline is usually easier to maintain than one that must be redirected every morning.
A five-point hair-behavior checklist
Look at your hair after washing and drying it in your usual way, before deliberately moving the part.
- Natural part: Where does the front section separate on its own? Note whether it stays to one side or repeatedly opens near the center.
- Cowlick direction: Does a section lift, rotate, or push sideways? Check which direction allows it to settle with the least effort.
- Curl shrinkage: Where do the front curls sit when fully dry and unstretched? Plan around that endpoint, not their damp length.
- Front-section density: How much hair is available around the hairline? Taking a deeper section for fuller bangs may leave less fullness at the temples or sides.
- Drying routine: Will you air-dry, diffuse, or use a brush and dryer? Choose a cut that works with the routine you will realistically maintain.
What changes with texture and density?
Straight hair shows the cutting edge clearly. A blunt line looks more defined, while carefully softened ends create a lighter finish.
Wavy hair may bend outward or divide into groups as it dries. The endpoint should account for those bends rather than assume the fringe will lie flat.
Curly and coily hair needs planning around dry length and natural curl groupings. A side fringe can follow those groupings without being straightened into one continuous sheet.
Fine strands tend to show separation clearly. A smaller fringe section with precise shaping may create a fuller-looking result than a wide section with heavily thinned ends.
Dense or coarse sections may resist a light sweep or feel heavy across the forehead. The stylist can adjust the section size and remove weight selectively while preserving enough structure to control the direction.
Strand thickness and density are different. Fine strands can still be densely packed, while thick strands can grow at a lower density.
Match the cut to your visual goal
- More exposed forehead: Choose lighter coverage and a sweep that leaves an open area.
- More emphasis on the eyes: Consider a brow-to-outer-eye transition with clear vision.
- More emphasis on the cheeks: Place the longer edge near the cheekbone.
- Softer framing: Ask for a gradual transition rather than a sharply separate fringe.
- Easier grow-out: Keep the shortest point longer and connect it to the front layers.
These are starting points, not rules about which features should be emphasized or softened.
Preview the length before committing
A pinned-section preview can help you compare coverage and placement without cutting. It is less reliable for predicting movement because folded or pinned hair retains the weight of its full length.
- Begin with your usual dry texture and part. Avoid pulling the front section tightly.
- Take a small section near the hairline. Sweep it toward the preferred side.
- Fold excess length back and pin it discreetly. Approximate endpoints at the brow, outer eye, cheekbone, and jaw in turn.
- Look from the front and a three-quarter angle. Keep your head level so each comparison uses a similar viewpoint.
- Check comfort. Blink, turn your head, and put on glasses if you wear them. Notice whether hair brushes your eyelashes or catches on the frames.
- Check your usual updo. With the hair unpinned, identify how much length must remain for the section to reach your ponytail. A folded preview cannot reliably prove tie-back reach.
- Judge the effort honestly. If the section only stays in place under tension, the finished fringe may need regular styling or a different direction.
For another visual reference, Facefy’s Hair Style Try-On can help you compare fringe lengths and proportions in a photo. Use a clear, eye-level image with even lighting and an unobstructed hairline. Treat the result as an appearance preview rather than a prediction of the finished cut. A photo cannot show how a cowlick will resist direction, how much curls will shrink, or how the fringe will move during the day.
What to ask your stylist for
Bring reference photos showing hair with a texture similar to yours, ideally from the front and side. Point out what you like specifically, such as the open forehead, light density, cheekbone endpoint, or the way the fringe joins the layers.
A useful request covers six decisions:
- Preferred side: Your left or right, not the side shown in a mirrored photo.
- Shortest point: For example, the outer brow.
- Longest point: For example, the cheekbone.
- Density: Light and airy, moderately full, or dense.
- Blending: A distinct fringe edge or a gradual connection.
- Dry result: How it should fall with your normal styling routine.
You could say:
“I want the fringe to fall to my left, start near the outer brow, finish around the cheekbone, stay light rather than dense, and blend softly into my front layers. I usually air-dry, so I want to see how it sits when dry.”
Ask the stylist to look at your natural part, cowlick, and curl pattern before wetting or redirecting the hair. For waves and curls, avoid making the final length decision solely from hair held wet and taut.
If you want a softer edge, discuss restrained point cutting, which uses small cuts into the ends to break up a solid line. It is not the same as removing substantial weight throughout the fringe, and it is not necessary for every texture.
Two ways to style side bangs without making them stiff
Root direction creates the sweep. A shallow bend gives the lengths movement. Trying to achieve both by tightly curling the ends often makes the fringe look rounded or rigid.
1. Wrap-drying to reset the roots
This method is useful for straight hair or waves you want to style smoother.
- Lightly dampen the fringe roots, including any stubborn part line.
- Apply a small amount of suitable heat protectant.
- Using fingers or a flat brush, guide the roots across the forehead in one direction while directing the dryer along the hair.
- Switch direction and guide them back across.
- As the roots become nearly dry, move the fringe toward its intended side.
- Let it cool in place before adding any finishing product.
Keep the dryer moving and use a comfortable heat setting. The back-and-forth movement can soften an established part, but it cannot permanently change a cowlick.
Avoid repeatedly brushing through curls if you want to preserve their natural grouping.
2. Overdirection followed by a soft bend
Overdirection means moving the hair slightly away from where it will eventually rest.
- On damp hair, guide the roots a little toward the opposite side from the finished sweep.
- Use a round brush to lift gently, then guide the lengths toward the intended side.
- Add a shallow curve through the mid-lengths rather than winding the ends tightly around the brush.
- Release the section and let it settle and cool without pulling it flat.
If using a flat iron instead, start with completely dry hair and heat protectant. Use a slight curve through the mid-lengths, not a tight turn at the tips. Avoid repeated passes over a resistant section.
For natural waves or curls, guide damp curl groups toward the preferred side with your fingers and a little lightweight styling product. Air-dry or diffuse gently. The result can be a series of side-directed curls rather than a smooth, continuous sweep.
Common side-bang problems and practical corrections
Start with the smallest correction. More heat or more product will not solve every mismatch between the cut and the growth pattern.
| Problem | Likely cause | First correction |
|---|---|---|
| Center separation | Natural part; roots dried divided | Dampen the roots and wrap-dry gently |
| Flat roots | Downward drying; heavy product | Overdirect gently and reduce root product |
| Outward flipping | Styling-created curve; natural bend; contact with glasses | Re-dampen the ends and brush-dry with a shallower curve |
| Oily or piecey fringe | Normal scalp oil; product buildup; frequent touching | Wash or refresh the fringe and use less product |
| Hair falling into eyes | Awkward endpoint; unstable direction | Pin temporarily and arrange reshaping |
For persistent center separation, consider a cut that accommodates the opening rather than repeatedly forcing it closed.
For an outward flip created during styling, lightly re-dampen the ends, place the brush beneath the section with minimal tension, and dry while guiding the hair in a shallower curve. Let it cool before touching it. If the flip comes from natural texture, a cowlick, or repeated contact with glasses or the cheek, additional heat may not help. A different endpoint or sweep direction may work better. Longer connecting layers can also flip where they meet the shoulders.
For oily or piecey bangs, remember that a fringe rests against the forehead and can show normal scalp oil sooner than the rest of the hair. Refresh only the fringe if the rest of your hair does not need washing, and keep rich conditioner or heavy styling cream away from the roots.
For eye-level pieces, pin them aside until they can be reshaped or grown longer. Repeatedly trimming individual strands without considering the whole sweep can leave an uneven edge.
A strong cowlick that continually resists styling is usually better accommodated through the cut than fought with higher heat.
Maintenance and grow-out expectations
Around three to six weeks is a reasonable starting estimate between reshaping appointments for a defined fringe. Your growth rate, texture, endpoint, and tolerance for change may make that interval shorter or longer.
Brow and outer-eye lengths show growth sooner because a small change can affect visibility or blur the cutting line. Cheekbone and jaw-length versions often allow more time because they gradually become face-framing layers.
During grow-out:
- Pin shorter pieces toward the side without pulling tightly.
- Tuck longer sections behind the ear if they reach comfortably.
- Incorporate the fringe into a loose twist or braid.
- Ask for the transition into surrounding layers to be softened while preserving length.
Side-bang questions answered
Can side bangs work with a middle part?
Yes, particularly when the fringe is long enough to split and blend on both sides. A short, strongly directional cut may look uneven when divided in the middle.
Tell your stylist if you want to switch between a middle and side part. The shortest point and connection to the opposite side need to support both arrangements.
Can wavy or curly hair have side bangs?
Yes. The cut should follow the dry curl pattern, shrinkage, and natural grouping at the front. A curly fringe does not need to form the same smooth diagonal edge as straight hair.
Plan the endpoint with the curls relaxed rather than stretched, and discuss whether you normally air-dry or diffuse.
Are long side bangs easier to grow out?
Generally, yes. They have less distance to travel before blending into surrounding layers and are often easier to pin or tuck.
They can still fall across the eyes during intermediate stages. Longer does not always mean less daily adjustment.
Which side should the bangs fall toward?
Start with the side that cooperates with your natural part and cowlick. That usually reduces the amount of root styling needed.
Your visual preference also matters. If you prefer the opposite direction, ask your stylist what extra styling it would require before committing.
Do side bangs work with glasses?
They can. Wear your everyday frames to the consultation so the stylist can check where the fringe meets the lenses, upper rim, and arms.
Aim for an endpoint that sits comfortably beside the frames rather than catching on them or repeatedly pushing hair toward your eyes.