Textured Fringe Haircut: Variations, Barber Instructions, and Styling
Learn what defines a textured fringe, compare lengths and sides, explain the cut to your barber, and style it for straight, wavy, or curly hair.
A textured fringe has intentionally separated, uneven pieces through the front, usually directed forward or slightly to one side rather than forming a solid, blunt line. It can work with straight, wavy, curly, or coily hair, but the right version depends on density, strand thickness, natural growth direction, shrinkage, side treatment, and styling preferences.
The most useful decisions are where the fringe should sit when dry, how much weight it should retain, and how closely the sides should be cut. Those details communicate much more than asking for a “messy” finish alone.
What defines a textured fringe?
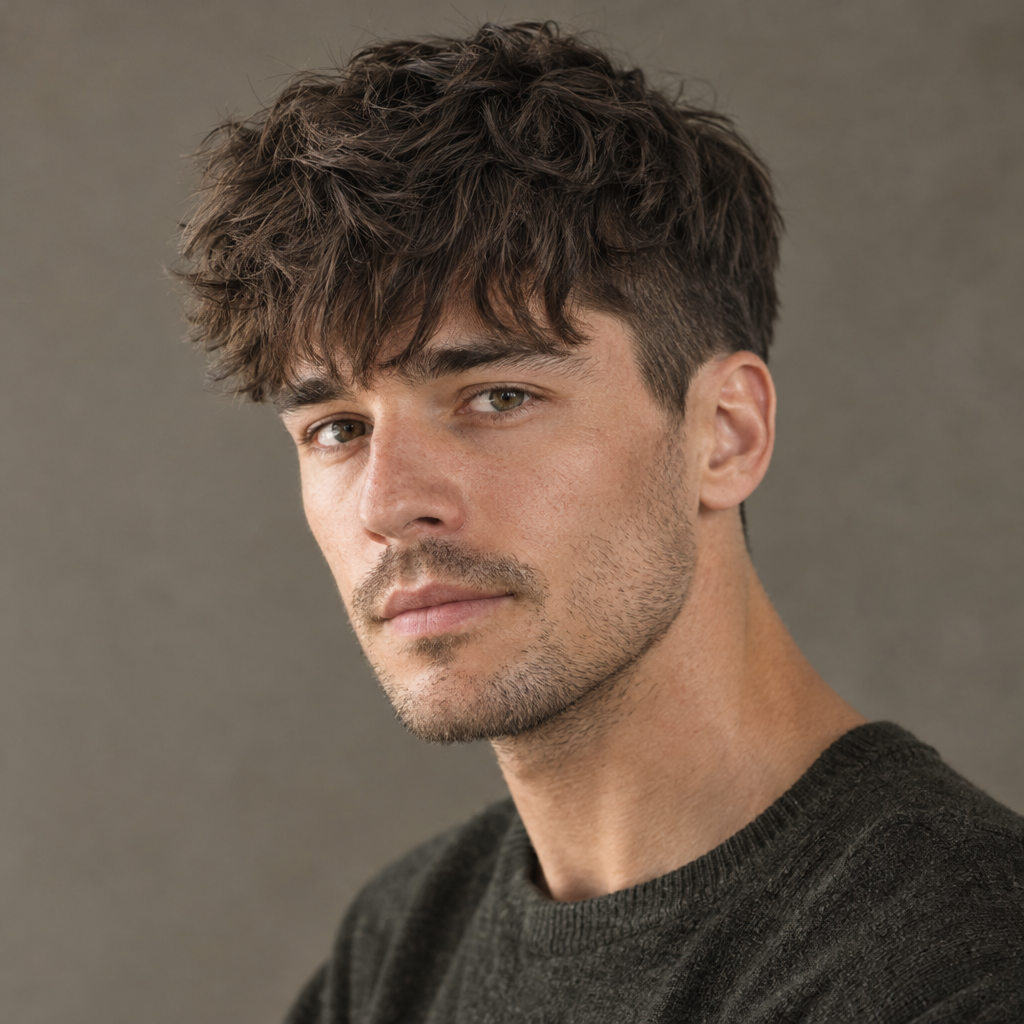
Look for a broken front edge, visible separation, varied piece lengths, and forward or diagonal movement. The name describes the front treatment, not a complete haircut, so the top and sides can vary considerably.
Cutting and styling contribute differently:
- Cutting changes the structure. Point cutting, where scissors enter the ends at an angle, can soften the edge. Carefully placed internal weight removal can help dense sections move.
- Styling changes the temporary finish. Drying direction and small amounts of product help pieces separate, bend, or hold together.
More thinning does not automatically produce better texture. Excessive weight removal can make a fine hairline look sparse, create unwanted puffiness, or disrupt the way curls group together.
How it differs from similar cuts
These categories overlap. A crop can have a textured fringe, while a blunt fringe describes an edge rather than the whole haircut.
| Style | Front edge | Direction |
|---|---|---|
| Textured fringe | Broken, varied pieces | Forward or diagonal |
| French crop | Short, with a blunt or textured edge | Mainly forward |
| Caesar cut | Usually short and horizontal | Forward |
| Blunt fringe | Continuous, clearly defined line | Usually straight down |
The top and sides provide another distinction:
| Style | Top texture | Typical sides |
|---|---|---|
| Textured fringe | Separated, from smooth to curly | Tapered, faded, or fuller |
| French crop | Compact and often textured | Short, tapered, or faded |
| Caesar cut | Short and relatively even | Short or tapered |
| Blunt fringe | Smooth or naturally textured | Any length |
These are common interpretations, not fixed salon definitions. A reference photo and a clear description of the edge are more reliable than the haircut name alone.
Textured fringe variations and how they change the look
Length, natural texture, and side treatment are separate choices. You can combine a longer wavy front with close sides, a low taper, or a fuller scissor-cut outline.
| Variation | Front and sides | Styling and grow-out tradeoff |
|---|---|---|
| Short | High on the forehead with tapered sides | Quick to style, but the edge changes quickly as it grows |
| Longer | Near the eyebrows with blended sides | More movement and control, but it may reach the eyes |
| Messy | Varied lengths with softer sides | Forgiving outline, though it still needs intentional shaping |
| Wavy | Natural bends with tapered or fuller sides | Light definition; wave placement may vary between washes |
| Curly | Dry-length allowance with shaped sides | Curl-focused care and a changing silhouette as it grows |
| Faded | Any front length with closely cut sides | Strong contrast that requires more frequent side cleanups |
| Fuller scissor-cut | Any front length with retained side weight | Softer outline and usually a gentler grow-out |
A messy version still needs structure. Random bulk can create a heavy cap rather than relaxed separation.
Natural waves and curls supply some of the texture themselves. The cut should accommodate their grouping and dry length rather than trying to reproduce straight-haired reference pieces.
A taper usually concentrates gradual shortening around the sideburns and neckline. A fade carries the transition through more of the sides and back, sometimes finishing very close to the skin. A burst fade is a more specific option that curves around the ear while retaining additional length toward the back. Terminology varies, so show the desired placement and specify how high and close you want the transition.
Check how your hair behaves before choosing the cut
Observe freshly washed hair as it dries without forcing it into a new position.
- Front growth pattern: Check whether the roots push the hair upward, sideways, or into a recurring split. Note which direction the front naturally prefers.
- Natural part: Does the front fall forward, or open in the same place every time? A strong part may make a diagonal fringe more practical than one directed straight forward.
- Shrinkage: Compare where a front section sits when damp and fully dry, without stretching it. Waves, curls, and coils may finish noticeably higher.
- Hairline density: Look for areas where the scalp is naturally more visible. Keeping broader, weightier pieces may work better than extensive thinning.
- Strand thickness: Fine strands can collapse under heavy products. Coarser strands may need more conditioning and control, even when overall density is low.
- Morning routine: Decide whether you are comfortable dampening and drying the front most mornings or prefer a cut that needs only finger shaping.
Decision shortcut: If your hair falls forward naturally, a compact fringe may be straightforward. If it rises or splits strongly, consider diagonal movement or additional length. If the hairline has lower density, prioritize retained weight over an extremely choppy finish.
Choose the front length and side treatment
Use forehead and eyebrow landmarks rather than measurements alone. The same measured length sits differently depending on head shape, root direction, hair texture, and shrinkage.
- Short: Sits around the upper third of the forehead when dry. It exposes more forehead and creates a compact outline.
- Medium: Sits between mid-forehead and just above the eyebrows. It offers room for visible separation and diagonal movement.
- Longer: Reaches the eyebrows or slightly below when dry. It allows more movement but can enter the eyes or reopen along a natural part.
These are useful consultation ranges, not standardized haircut categories. Specify your preferred landing point directly.
Curl shrinkage and upward-growing roots can make the dry fringe sit higher than its initial cutting position. Ask the stylist to assess the front in its natural dry fall before finalizing the length.
Match the sides to your preferred contrast
Tapered edges retain more side coverage while keeping the perimeter neat. Faded sides create stronger contrast, particularly when taken close to the skin, but the transition becomes less crisp as hair grows.
Disconnected sides leave a deliberate length difference between the top and sides instead of blending them smoothly. Fuller scissor-cut sides retain a softer outline and usually make small amounts of growth less conspicuous.
Choose a level of contrast you enjoy maintaining. A sharp fade may suit your visual preference, but it will usually show growth sooner than fuller sides.
What to ask your barber or stylist for
Build your request around five decisions:
- Landing point: “I want the front to sit just above my eyebrows when dry.”
- Edge: “Keep the edge soft and broken, not a solid horizontal line.” For a neater result, request a more defined overall outline with separated tips.
- Weight: “Keep substantial pieces through the hairline. Remove bulk selectively rather than thinning the entire front.”
- Direction: “I want it to move forward and slightly to my right, following its natural fall.”
- Sides: “Keep fuller sides with a low taper,” or specify the height and closeness of your preferred fade.
A complete request might be:
“I’d like a textured fringe that sits just above my eyebrows when dry, with a soft, broken edge and enough weight to avoid gaps. Style it forward and slightly right. Keep the sides fuller with a low taper around the ears and neckline.”
Bring front and side reference photos. Point out the specific features you want to copy, such as the fringe landing point, separation, side fullness, and overall silhouette. Then ask, “Which parts of this shape will my hair do naturally, and which will require daily styling?”
Photos show a styled moment. Lighting, camera angle, products, extensions, and concealed lengths can make density and shape difficult to judge. Multiple references from different angles are more informative than one carefully posed image.
How to style a textured fringe for your hair type
Choose a routine based on both strand thickness and overall density. These are not the same characteristic, and your hair may fit more than one category.
For example, dense straight hair made of fine strands may benefit from the lightweight product amounts in the fine-hair routine but the sectioned drying method used for thick hair. Fine curly hair should follow curl-preserving drying and shaping methods while using smaller amounts of cream or gel to avoid weighing the pattern down.
Start with less product than you expect to need. The quantities below are starting points for a short top. Hair length, density, strand thickness, and product concentration all affect the amount required.
Straight or fine hair: airy separation
- Gently towel-blot until damp.
- Apply heat protectant according to its directions if blow-drying.
- Add a light pre-styler or one or two light sprays of texture spray, unless the protectant already provides enough grip.
- Dry from the roots forward, using your fingers to guide the fringe slightly diagonally if needed. Avoid lifting the entire front upward.
- Rub roughly half a pea-sized amount of lightweight matte paste between your hands. Touch it through the ends, then separate a few broader pieces.
The goal is movement without heavy clumps. Fine hair may need only the pre-styler, with no finishing paste.
Thick hair: defined pieces with controlled volume
- On damp hair, distribute a small pea-sized amount of lightweight control cream through the top.
- Apply heat protectant if it is not already included in the product.
- Divide the front into small sections. Dry each section forward and slightly downward rather than drying the entire fringe at once.
- Once dry, spread half a pea-sized amount of matte clay thoroughly between your palms.
- Work mainly through the mid-lengths and ends. Add another small amount only if necessary.
Aim for controlled bulk with visible pieces. Dense hair may need more product, but adding it gradually avoids coating the entire front heavily.
Wavy, curly, or coily hair: definition without disrupting the pattern
- Start with damp hair and smooth a small amount of curl cream through the front. Use less for fine strands and increase gradually for dense or coarse hair.
- Arrange the fringe in its natural direction, lightly scrunching or shaping individual curl groups.
- If diffusing, apply a suitable heat protectant and use low airflow with low to moderate heat. Support the curls instead of blowing them upward.
- Alternatively, air-dry without repeatedly touching the front.
- Once fully dry, gently separate only the groups that need adjustment.
For coily textures, allow for shrinkage and avoid stretching the fringe downward unless a stretched finish is your goal. Cream alone may not provide enough hold, so a small amount of lightweight gel can help maintain definition.
If you want to compare cuts that retain natural volume and account for shrinkage, Facefy’s Hairstyle Finder can offer ideas to review before an appointment. Treat previews and suggestions as starting points, since your curl pattern, density, current length, and styling method will affect the finished result.
Optional grip: Texture powder belongs on dry roots when lift is needed. Sea salt spray can add grip, but it may leave some hair feeling rough or dry. Neither is essential.
How to fix common textured fringe problems
Helmet-like weight
Likely cause: Excess bulk, insufficient internal shaping, or a continuous front edge.
Adjustment: Ask about selective internal shaping and a softer perimeter. More product will not reliably correct a heavy outline, and indiscriminate thinning can create gaps or extra puffiness.
Stringy or greasy pieces
Likely cause: Too much product, an overly rich formula, or application near the roots.
Adjustment: Reset with a wash if necessary, then use less product. Spread finishing paste or clay thoroughly between your hands and concentrate it on the ends.
Visible gaps
Likely cause: Excessive thinning, lower hairline density, or overly narrow separation.
Adjustment: Shape fewer, broader pieces and avoid pulling the fringe into tiny spikes. If too much weight was removed, regrowth and a more conservative approach at the next cut may be needed.
Excess puffiness
Likely cause: Upward drying, insufficient conditioning, or weight removal that encourages expansion.
Adjustment: Dry toward the intended finish and use a small amount of suitable conditioning or control product. A consistently expanding or triangular shape may need a haircut adjustment rather than additional styling product.
A fringe that lifts or splits
Likely cause: Natural root direction, an established part, or drying the front away from its intended position.
Adjustment: Re-dampen the roots directly around the split rather than wetting only the tips. Divide the area into small sections, then guide each section toward the intended forward or diagonal fall while drying on moderate heat. Hold the sections in place as they cool, then release them and assess the result.
If the split returns consistently, adapt the fringe to follow that direction or retain more length and weight. Repeatedly forcing a strong growth pattern with higher heat or stronger products can make the routine unnecessarily difficult.
A fringe that springs too short
Likely cause: Curl shrinkage or upward growth overlooked during cutting.
Adjustment: Avoid forcing it flat with excessive heat. Allow more length at the next appointment and assess the final landing point when the hair is fully dry.
How face proportions affect the visual result
Your facial proportions can help you anticipate visual effects, but they do not determine whether you can wear this haircut. A shorter front exposes more forehead, while a longer fringe frames the eye and brow area more closely.
Fuller sides create a broader hair outline. Closely faded sides reduce that width and concentrate more attention on the fringe and top. This contrast can be as noticeable as changing the front length.
Hair behavior remains the more practical filter. A reference with similar density, strand thickness, growth direction, and natural movement is generally more useful than one chosen solely because the person appears to have a similar face shape.
Maintenance and grow-out
Many short textured cuts lose their intended outline within roughly three to six weeks. Sharp fades and very short fringes may look overgrown sooner. Your growth rate and preferred level of neatness determine the actual interval.
A smaller fringe cleanup can restore the front without repeating the entire haircut. Ask whether separate front and side appointments make sense for your chosen shape.
As the fringe grows, it gains weight, separates differently, and may fall into the eyes or return to a natural part. Fuller sides usually tolerate this softening more easily than a close fade.
Daily effort can range from damp-finger shaping to directed blow-drying. If the routine repeatedly feels excessive, changing the length, direction, or side treatment may help more than switching products.
Avoid trimming a curly or coily fringe based only on how far it stretches when wet. Its fully dry position is the more useful guide for deciding whether it needs shortening.
Textured fringe questions
Can straight hair hold a textured fringe?
Yes. Very straight or fine hair may need light grip and directed drying to maintain separation. It does not need to look wavy to qualify as textured.
Can it work with a strong front growth pattern?
Often. Following the natural direction or retaining enough length and weight can help. A very short fringe may stand up or split more than expected.
Can you wear it without a fade?
Yes. Tapered edges or fuller scissor-cut sides create softer alternatives. The separated front defines the fringe, not the closeness of the sides.
Does it require daily styling?
Not always. Naturally forward-falling hair may need little adjustment. Strong root patterns, longer fronts, and polished finishes usually require more attention.
How do you prevent a greasy finish?
Start with a small amount of lightweight product, keep finishing products away from the roots, and add more only where separation is needed. If the fringe already feels coated, washing and restarting usually works better than adding powder or more styling product.
How often should the fringe be trimmed?
Use its dry landing point as your guide. If it blocks your eyes, loses the edge you wanted, or requires noticeably more styling, arrange a cleanup. A softer grown-out shape can wait longer if it still feels comfortable and manageable.