Lemonade Braids: Styles, Variations, Care, and What to Ask Your Braider
Learn what defines lemonade braids, compare sizes and patterns, prepare for your appointment, and care for your braids without excess tension.
Lemonade braids are cornrows directed across the scalp toward one side, creating a distinctive side-swept finish. They can be small or large, short or long, with optional added hair, color, curly ends, beads, or cuffs. The braid direction defines the style, not a particular length or extension technique.
Beyoncé’s 2016 Lemonade visual album helped popularize the contemporary name and reference look, but side-swept cornrowing belongs to much older Black and African braiding traditions. Choosing your version means balancing the pattern you like with your hair’s density, scalp comfort, and everyday routine.
What makes lemonade braids different from other cornrows?
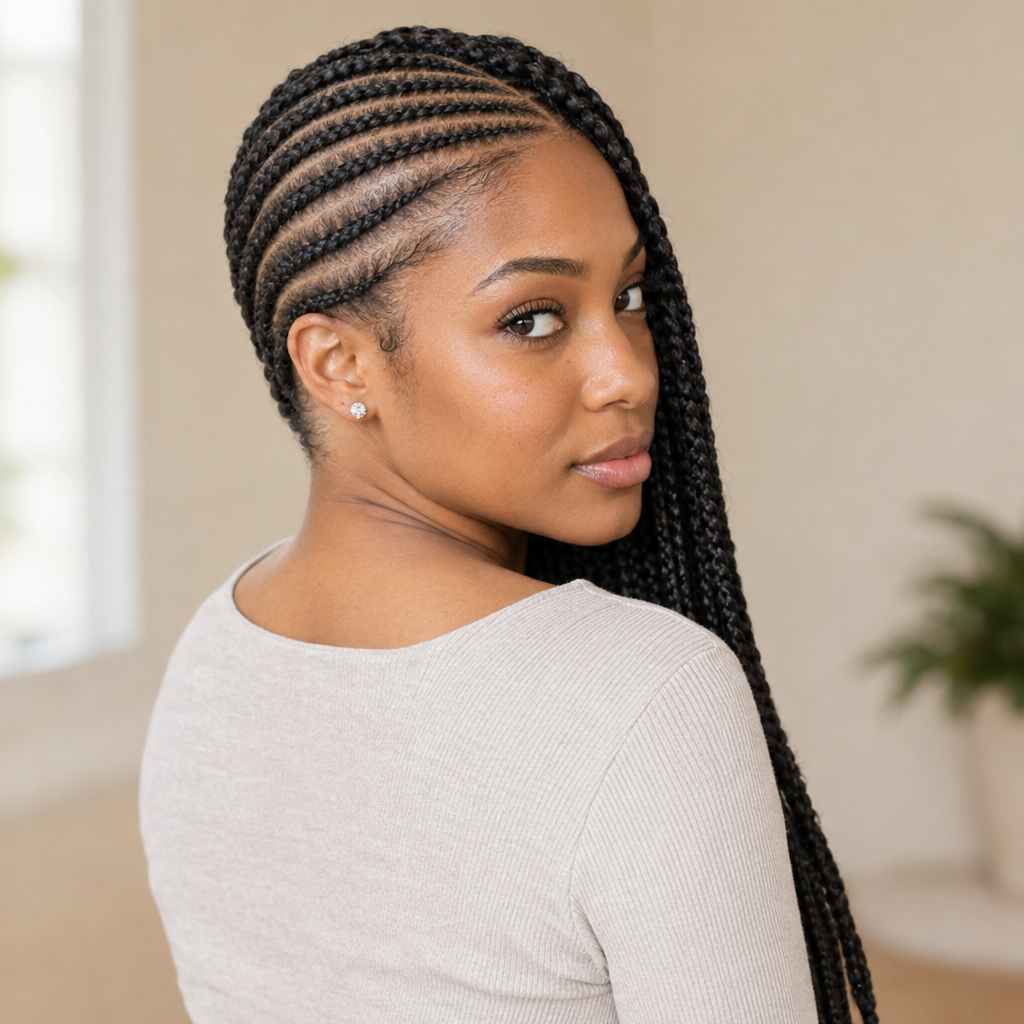
Cornrows are braided close to the scalp, following a planned path. In a lemonade braid design, those paths travel or curve toward one side rather than simply running from the forehead toward the nape.
Lemonade describes the layout. Feed-in and stitch describe ways of creating or detailing the braids. A single hairstyle can combine all three.
| Term | What it describes | Recognizable feature |
|---|---|---|
| Lemonade braids | Side-swept layout | Rows directed toward one side |
| Straight-back cornrows | Front-to-back layout | Rows run toward the nape |
| Feed-in braids | Gradual addition of extension hair | Braid thickness builds gradually |
| Stitch braids | Sectioning and braiding detail | Distinct horizontal lines beside rows |
Feed-in placement can help a braid transition from a smaller beginning into a fuller length. Stitch detailing creates visible, repeated sections along a row. Neither technique automatically makes a hairstyle lemonade braids because the overall direction still matters.
The cultural roots behind the name
Cultural context
Side-swept cornrowing comes from established Black and African braiding traditions. Beyoncé did not invent cornrows or side-swept braiding. Her 2016 Lemonade visual album helped popularize the contemporary name “lemonade braids” and a widely recognized reference look within that broader tradition.
The name is useful when discussing inspiration, but it does not describe every construction detail. Two braiders may interpret the same request differently, which makes reference photos especially helpful.
The visual anatomy of lemonade braids
Read an inspiration photo in layers, starting with the braid paths rather than the accessories.
- Direction: Where do the rows begin? Do they curve around the crown, cross diagonally, or follow a gentler arc? Which side receives the hanging braids?
- Parting pattern: Look for simple curved rows, geometric sections, or horizontal stitch lines. Parting is the exposed scalp pattern between sections, not the braid itself.
- Width and spacing: Identify small, medium, large, or alternating braid widths. Notice how much space separates the rows, too.
- Final length: Use landmarks such as the jaw, shoulders, mid-back, or waist. A cropped portrait may hide most of the finished length.
- Added hair: Extensions may supply length, fullness, or color. Gradual feed-in placement is one installation option, not a requirement.
- Finishing details: Curly ends, contrasting strands, beads, cuffs, thread, and styled edges are optional.
For example, a style might combine side-swept cornrows, medium-width rows, curved parts, mid-back extensions, and plain ends. Adding stitch sections or cuffs changes the detailing without changing the underlying layout.
Photos cannot reliably show extension weight, scalp tension, or installation comfort. Lighting can exaggerate scalp contrast, while angles and crops can hide the starting points of the rows. Use images to communicate appearance, then let the braider assess what your hair can comfortably support.
Lemonade braid variations at a glance
These variations can overlap. You might choose bob-length braids with curved parts or small feed-in braids with subtle color.
Color is another way to personalize lemonade braids, whether you prefer natural-looking extensions, subtle highlights, or bold contrasting shades. Facefy’s Hair Color Try-On can help you explore color ideas before discussing extension shades with your braider.
| Variation | Appearance and preference | Practical tradeoff |
|---|---|---|
| Classic side-swept | Consistent rows with an understated finish | Fewer decorative details usually mean less snagging and simpler daily handling |
| Small feed-in | Fine detail with thickness that builds gradually | More sections can extend installation time, and each small natural-hair section should support only a suitable amount of added hair |
| Larger statement | Bold, graphic rows with fewer visible sections | Added hair must remain proportionate to the natural hair supporting each row, even when the overall braid count is lower |
| Stitch-pattern | Crisp horizontal details beside the cornrows | Precise sectioning adds appointment work and makes new growth more visually noticeable |
| Curved parts | Flowing arcs with softer geometry | Bring a close reference showing the exact curve because a front-facing photo may not reveal the full path |
| Mixed braid sizes | Alternating widths with stronger visual contrast | Identify which rows should be wider and show their placement in a reference photo |
| Bob-length | Compact outline with less hanging length | The ends need deliberate shaping so the finished outline sits as intended |
| Long braids | Extended sweep with more movement | Extra length can increase weight, washing effort, and drying time |
| Colored extensions | Subtle accents, blended tones, or all-over contrast | Extension shades can look different under indoor lighting, daylight, and camera processing |
| Curly-ended | Loose texture with a softer finish | Unbraided ends can tangle and need separate refreshing or detangling |
Smaller braids usually involve more individual sections and potentially more installation work. Larger braids create a bolder pattern with fewer rows, but they are not automatically lighter or gentler. What matters is how much natural hair supports each braid and how much added hair or decoration it carries.
Curly ends deserve particular attention if you want minimal daily handling. Unlike fully braided ends, loose hair may tangle and require its own conditioning or refreshing routine, depending on the extension material.
How to choose your braid size, length, pattern, and details
Start with your daily routine, then choose the design. The most intricate version is not necessarily the version you will enjoy wearing most. If easy upkeep is the priority, a moderate length with fully braided ends and limited accessories will generally require less handling than very long braids with loose curls and extensive decoration.
| Choice and options | Visible effect | Practical tradeoff | Who may prefer it |
|---|---|---|---|
| Braid width: fine, medium, large, or mixed | Fine rows create intricate detail; larger rows make the sweep bolder; mixed widths add contrast | Fine rows require more sections and installation work. With any size, the extension amount should suit the natural hair supporting that section | Fine rows may suit someone prioritizing intricate detail. Medium or larger rows may suit someone who wants a bolder pattern with fewer individual braids |
| Length: bob, shoulder, mid-back, or longer | Shorter lengths create a compact outline; longer braids provide more movement and visual sweep | Added length can increase weight, washing effort, drying time, and contact with clothing | Shorter lengths may suit frequent exercise, swimming, or easier activity management. Longer lengths may appeal to someone who prioritizes movement and styling range |
| Parting pattern: simple curves, stitch lines, geometric sections, or mixed widths | Simple curves look fluid; stitch and geometric sections make the scalp pattern more prominent | Detailed parting takes more appointment time and usually requires clearer reference images | Simple curves may suit someone seeking an understated design. Intricate parts may suit someone who wants the scalp pattern to be a main feature |
| Extension amount and weight: minimal, moderate, or full | Less added hair creates a lighter outline; more hair adds fullness and length | Extra fullness increases the load on the supporting natural-hair sections and can make wet braids harder to manage | A lighter amount may suit sensitive scalps, fragile areas, or active routines. More fullness may suit someone who wants a denser silhouette and is comfortable managing the added weight |
| Color: natural match, a few contrasting strands, blended tones, or all-over contrast | A few contrasting strands create localized accents; blended tones add dimension; all-over contrast makes the entire installation one prominent color | All-over contrast commits the full style to that shade, while accent strands are easier to place selectively. Daylight samples show color differences more reliably than photographs alone | Accent strands may suit someone testing a visible color without changing the full look. All-over contrast may suit someone who wants color to define the installation |
| Accessories: none, a few accents, or decoration throughout | Beads, cuffs, and thread can create subtle highlights or a highly decorated finish | Accessories add combined weight and may snag on clothing, press during sleep, or interfere with headphones | Fewer accessories may suit frequent headphone use, exercise, or low-maintenance routines. More decoration may suit someone comfortable managing the extra contact and weight |
Before settling on a version, ask yourself:
- Do I want a compact outline or long, moving lengths?
- Am I willing to detangle and refresh loose curly ends?
- Have added hair or tight styles caused discomfort before?
- How often will I exercise or swim?
- Do I regularly wear over-ear headphones, hats, or work headwear?
- Can I comfortably manage the extra weight and drying time?
If you are still deciding between hairstyle directions, Facefy’s Hairstyle Finder is an optional way to explore ideas based on your preferences before collecting reference photos. It does not replace a braider’s assessment of hair condition, section support, or tension.
What to show and tell your braider
Bring front, side, and back views where available. One tightly cropped image may show the parting beautifully while hiding the length, finishing method, or opposite side.
Use this seven-point consultation checklist:
- Braid direction: Specify whether the finished sweep should fall to your left or right. Confirm on your own head since selfies may be mirrored.
- Braid size: Point to the row width you like and say whether you want consistent or mixed sizes.
- Parting reference: Identify curved rows, stitch detail, geometric sections, or another specific pattern.
- Final length: Use shoulders, mid-back, or waist as landmarks. For curly ends, clarify the desired resting length.
- Extension color: Choose a match, blend, accent placement, or full contrast. Confirm whether hair is supplied.
- Edge preference: Say whether you want natural edges, light styling, or no edge product. Edge styling is optional.
- Sensitivity or tension concerns: Identify sensitive areas, current breakage, fragile edges, or previous discomfort with braids.
A clear request might sound like:
“I’d like medium side-swept cornrows falling to my left, curved parts like this photo, and shoulder-length ends. I want a dark extension match, no beads, and my edges left natural. My temples are sensitive, so please keep those areas light.”
Ask how your hair should be prepared before arriving. Requirements differ by service and hair characteristics. Confirm whether washing, detangling, or stretching is included, and whether heat stretching is necessary rather than assuming it is.
What happens during installation?
The braider will usually begin by confirming the sweep direction, parting pattern, braid widths, length, and finishing details. Your hair is then prepared and detangled as needed before the scalp sections are created. Each row is braided along its planned path, with extension hair added gradually if the design uses a feed-in method. The hanging lengths and ends are then completed according to the chosen hair and finish, such as fully braided, curled, or decorated.
Check comfort after the first few rows. This gives the braider an opportunity to adjust grip, section size, or extension amount before the entire installation is complete. Mention pulling or soreness immediately rather than waiting until the end.
What affects appointment time and price?
There is no universal price or installation time for lemonade braids. The quote depends on both the design and what the appointment includes.
The main variables are:
- Braid size and section count: More rows generally mean more individual braids to complete.
- Length and added hair: Longer braids require more work along their lengths.
- Pattern detail: Stitch sections, geometric parts, and mixed widths can increase complexity.
- Finishing: Curly ends, color blending, beads, and cuffs add separate steps.
- Preparation: Washing, detangling, and stretching may be separate services.
- Location and service type: Local pricing, stylist experience, and salon or mobile appointments affect the total.
Send the reference photo with your requested length, size, color, and finish when asking for a quote. Ask whether the estimate includes hair and preparation, and how much time to reserve for the complete appointment.
How tight should fresh lemonade braids feel?
Fresh braids may feel noticeable because your hair is arranged differently. Significant pain is not a necessary part of braiding, and you do not need to endure it for the style to last.
Use this three-level comfort check.
Level 1: Mild awareness without ongoing discomfort
You can feel the new arrangement, but there is no persistent soreness, pain, or pulling at the hairline.
Action: Monitor comfort without repeatedly tugging on the rows. Keep scarves and gathered lengths loose enough that they do not add pressure.
Level 2: Persistent soreness or tight pulling
The scalp continues to feel sore, individual rows pull, or normal head movement creates discomfort.
Action: Tell the braider immediately and have the affected areas loosened or redone with less tension. If you have already left, contact them promptly. Do not simply wait for painful braids to “settle.”
Level 3: Pain or visible scalp changes
Pain, bumps, redness, broken skin, a headache associated with pulling, or visibly strained hairline sections need action.
Action: Remove the tension promptly, which may require taking out affected braids or the style. Seek healthcare guidance if symptoms continue, the skin is injured, or you notice thinning or hair loss.
Do not mask pain simply to preserve the hairstyle. Braids may reduce daily manipulation, but calling them a protective style does not guarantee protection when they are too tight, too heavy, or worn despite discomfort.
Caring for lemonade braids in different situations
Care should respond to your scalp, activities, and braid construction rather than a rigid calendar.
Sleeping
Use a smooth scarf, bonnet, or pillowcase to reduce friction. Gather long lengths loosely instead of folding them into a tight bundle that pulls at the roots.
A wrap should not leave your forehead aching or increase pressure around the hairline. Keep beads and cuffs from pressing into your scalp or face.
Scalp cleansing
Braids can be washed. Gently work shampoo along the accessible parts with your fingertips, avoiding aggressive scratching or pulling the rows apart. Rinse thoroughly so cleanser does not remain trapped at the braided base.
Support longer lengths while washing rather than letting their wet weight hang from the scalp.
Complete drying
Allow the scalp, natural hair inside the braids, and added hair to dry thoroughly. A dry outer surface does not necessarily mean the base is dry.
Gently squeeze out excess water and blot with a towel. Use airflow and, if needed, a comfortably warm dryer setting suitable for the extension material. Avoid covering persistently damp braids with a tight wrap or bonnet.
Exercise
Keep lengths out of the way with a loose arrangement that does not pull against the cornrow direction. Afterward, let the scalp dry and cleanse when sweat or residue warrants it.
Repeatedly tightening the braids into a high ponytail can add tension even when the original installation was comfortable.
Swimming
Wet extensions can feel considerably heavier. Support the lengths, avoid tight gathering, and rinse away pool or saltwater residue afterward. Cleanse as needed and leave enough time for thorough drying.
If you swim frequently, shorter lengths and less added bulk can make this routine more manageable.
Managing buildup and frizz
Use products sparingly. Repeated layers of edge control, oil, mousse, and spray can leave residue without addressing the reason your scalp feels uncomfortable.
Do not scrape buildup away with a sharp comb or fingernails. Frizz and visible natural texture are normal changes, not defects that require increasingly tight styling.
Deciding when to remove the style
No fixed wear period is appropriate for everyone. Consider comfort, new growth, buildup, slippage, hair condition, and scalp response.
Removal may be appropriate when the roots become difficult to cleanse, sections tangle around new growth, extensions slip, or the style begins pulling. Do not keep uncomfortable braids solely to reach a planned date.
When the standard version may need adjusting
A reference photo is a starting point, not a guarantee that every detail will suit every head of hair.
- Short hair: Secure installation depends on usable length, grip, and hair condition. Ask the braider to assess whether your preferred pattern is realistic. Extra tension should not be used to compensate for insufficient length.
- Fine or sparse edges: Reduce added weight and consider carefully planned, sometimes larger supporting sections. Leaving fragile areas out may be preferable to forcing every hair into a row.
- Sensitive scalp: Disclose sensitivity before braiding begins. Prioritize low tension over an ultra-sleek appearance, and speak up during installation rather than waiting until the end.
- Prior breakage: Braids do not repair existing damage. Ask for an assessment of fragile areas before adding extensions. A lighter design or postponing the style may be more appropriate.
- Frequent swimming or exercise: Choose a length and density you can wash and dry thoroughly. Expect sweat, water exposure, and repeated handling to affect freshness.
- Heavy accessories: Reduce the number of beads or cuffs if they pull, snag, or create pressure. A few lightweight accents can provide detail without decorating every braid.
Not every requested variation can be installed safely or comfortably on every person. Changing the design is often more useful than trying to force the exact reference.
How to remove lemonade braids gently
Set aside enough time to work without rushing. Removal should not become a session of pulling through resistance.
- Identify where your natural hair ends. If cutting extension hair, cut well below that point. If you are unsure, unravel without cutting.
- Remove accessories carefully. Open or slide them off without dragging them through the hair.
- Unravel from the ends upward. Use your fingers or a suitable blunt tool gently, taking extra care near the scalp.
- Separate each released section. Do not immediately rake a comb through accumulated shed hair and buildup.
- Detangle gradually. Use a suitable detangling product for slip, loosen tangles with your fingers, then work from the ends upward.
- Cleanse after careful detangling. Avoid rubbing tangled sections together.
Shed hair can remain caught inside braids until removal, so some collected hair is expected. That does not mean every amount or pattern of hair loss should be dismissed as normal.
If you uncover broken skin, significant tenderness, or another concerning scalp change, pause forceful handling and seek appropriate professional guidance.