Jellyfish Haircut Guide: Variations, Styling, and Salon Tips
Learn what defines a jellyfish haircut, compare variations, adapt it to your hair texture, and explain the cut clearly to your stylist.
A jellyfish haircut has two visibly separate levels: a short, rounded or bob-like upper section and a distinctly longer lower section. Unlike conventional layered cuts, the tiers are intentionally disconnected rather than smoothly blended.
That structure is flexible. The upper tier can sit near the cheekbones, jaw, or shoulders, while the lower section extends beneath it. The best version for you depends on how much contrast you want, how your hair naturally falls, and whether you are comfortable styling two different lengths.
What Defines a Jellyfish Haircut?
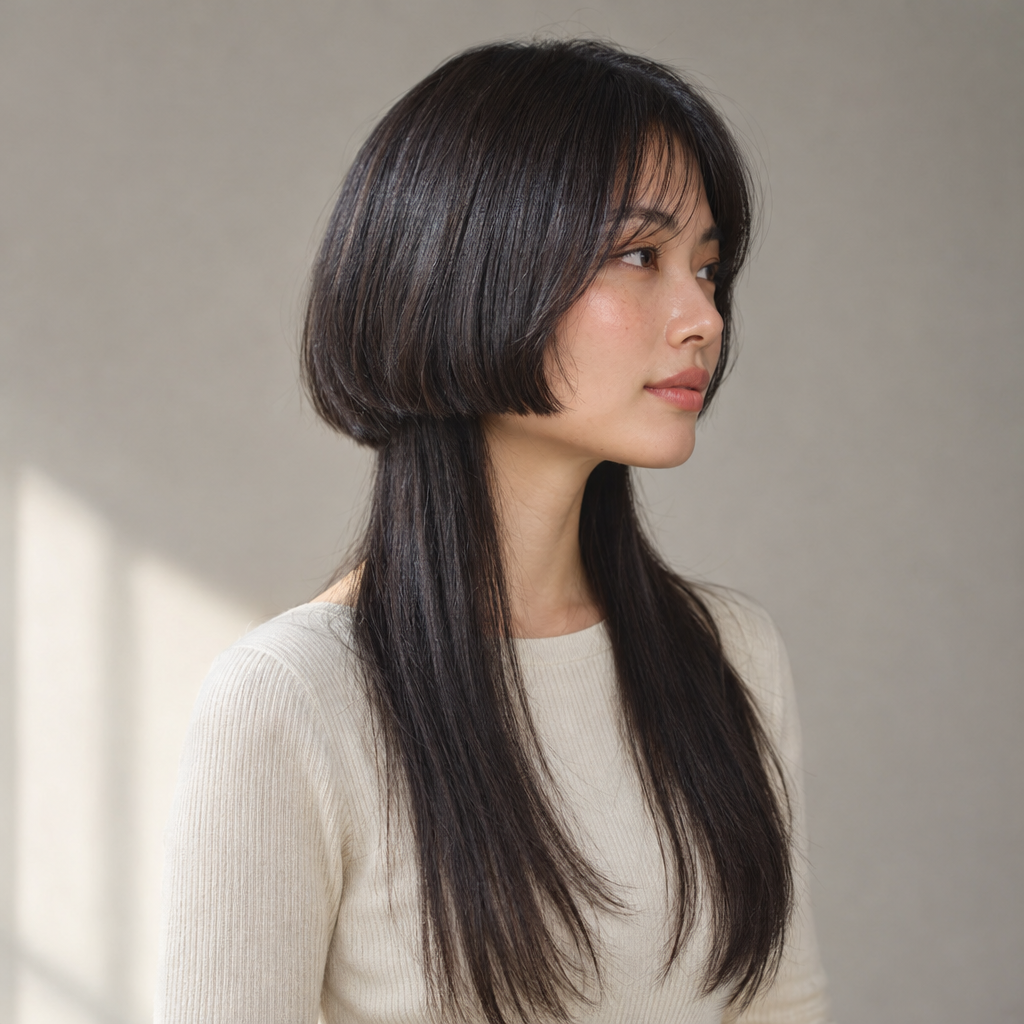
The name comes from the silhouette. A rounded upper section resembles a jellyfish’s bell, while longer strands hang below like tentacles. The clearest way to identify the cut is by its construction rather than the trend name alone.
Four adjustable elements determine the result:
- Upper-tier endpoint. A cheekbone-length top creates a compact shape higher on the face. A jaw- or chin-length top reads more like a bob. A shoulder-level top gives the cut a longer, less compact silhouette.
- Amount of disconnection. Disconnection means the shorter hair stops without a continuous series of layers joining it to the longer hair. A smaller length gap looks quieter, while a larger gap makes the two levels more obvious.
- Lower-tier length. The underlayer might reach the shoulders, collarbone, chest, or farther down. Its length and fullness determine whether it looks like a substantial second section or a few narrow tails.
- Blunt versus softened perimeter. A blunt edge creates a crisp line. Light point cutting, where a stylist cuts into the ends with the tips of the scissors, can soften that edge without blending the tiers together.
Soft edges and connected layers are not the same thing. A jellyfish cut can have lightly textured ends while maintaining clear separation between its upper and lower levels.
From the front, you see the shorter frame against the longer strands. The profile reveals exactly where the upper section stops. From the back, a classic version shows a bob-like outline sitting over a longer underlayer. That back view is especially important when choosing reference photos.
Jellyfish Cut vs. Hime, Octopus, Wolf, and Shag Haircuts
These names sometimes overlap in salon menus and inspiration photos. Compare the construction instead of assuming every stylist uses the same definition.
| Cut | Tier separation | Blending | Top silhouette | Lower length | Overall contrast |
|---|---|---|---|---|---|
| Jellyfish | Distinct upper and lower tiers | Intentionally disconnected | Rounded or bob-like cap | Clearly extends below the upper tier | Defined two-level shape |
| Hime | Short side panels beside longer hair | Often disconnected around the face | Long crown with blunt side sections | Usually remains long through the back | Strongest around the face |
| Octopus | Fuller top above tapered lengths | Generally connected through layers | Rounded, layered volume | Longer ends with a tapered appearance | Top-heavy with a softer transition |
| Wolf | Short crown above longer lengths | Connected through choppy layers | Tousled crown volume | Often extends farther around the nape | Shaggy and sometimes mullet-like |
| Shag | Multiple graduated layers rather than two tiers | Connected and highly textured | Variable crown volume | Can be short, medium, or long | Texture distributed throughout the cut |
The main distinction is where the separation occurs. A hime cut usually emphasizes short side sections around the face while leaving the crown and back long. A jellyfish cut typically carries the shorter shape around more of the head.
Octopus, wolf, and shag cuts generally use connecting layers to move from short to long. A jellyfish cut deliberately interrupts that transition, creating a visible break between its two levels.
Three Main Jellyfish Haircut Variations
Choose your preferred level of contrast before deciding on fringe, edge texture, or styling details.
| Version | Visual effect | Maintenance action |
|---|---|---|
| Subtle | Smaller tier gap with softer edges | Allow the dividing line to soften and reshape it when the tiers begin to merge visually |
| Classic | Bob-like top over a clearly longer underlayer | Maintain the upper outline and lower perimeter as separate sections |
| Editorial | Exaggerated separation with a crisp outline | Reshape the upper perimeter precisely when it moves beyond its intended landmark |
Subtle: a smaller gap and softer edges
A subtle version usually has a longer upper tier, a shorter gap between levels, and softened ends. For example, the upper section might finish near the shoulders while the lower section reaches the chest.
It still needs a visible break to read as a jellyfish cut. Connecting everything with gradual layers moves it toward a conventional layered style.
This version is often easier to wear with natural movement and more forgiving during grow-out. The tradeoff is that waves, curls, or a small length difference can make the separation difficult to see.
Classic: a clear bob over longer hair
The classic version pairs a rounded, often jaw- or chin-length upper section with a noticeably longer underlayer. It is the clearest choice if you want both levels to remain recognizable.
A curved-under top emphasizes the rounded shape, but it is not mandatory. A straight or naturally textured finish can work too. The upper outline and lower ends need to be evaluated and trimmed separately so one tier does not lose its intended shape while the other remains unchanged.
Editorial: exaggerated length separation
An editorial version might combine a cheekbone-length cap with chest-length strands, a sharply blunt upper edge, or an especially long lower section.
Its impact comes from deliberate contrast. If you want it to resemble a polished reference photo every day, it may require more section-by-section styling. Sharp outlines also show growth quickly because even a small shift can move the upper edge away from its intended cheekbone, jaw, or chin landmark.
Blunt, textured, short, and extra-long treatments can appear within all three versions. They are adjustments to the same two-tier structure rather than completely separate haircuts.
How to Adapt the Cut to Your Texture and Density
Texture describes the hair’s natural pattern, while density describes how much hair grows across the scalp. Strand thickness is another variable. Fine hair can be dense, and coarse hair can have low density, so more than one row may apply to you.
| Hair profile | Concrete cutting adaptation | Resulting tradeoff |
|---|---|---|
| Fine or low-density | Reserve more hair for the long underlayer and limit thinning through both perimeters | The upper cap may look less full or dramatic |
| Thick or high-density | Remove weight selectively inside the upper tier while protecting its outer edge | The cap settles more easily, but excessive internal removal can weaken its rounded outline |
| Wavy or curly | Place both endpoints according to their dry natural fall and soften the upper perimeter if needed | The separation may look less geometric than it does on straight hair |
| Coily or shrinkage-prone | Position the tiers around the usual dry, worn silhouette rather than stretched length | The apparent spacing between tiers will change when the hair is stretched or styled differently |
Fine or low-density hair
Ask how much hair will remain in the long section before the upper tier is cut. Allocating too much hair to the short cap can leave the lower section looking sparse.
A fuller lower perimeter and restrained texturizing usually make more sense than heavily thinning both sections. A subtle version may preserve a more substantial overall silhouette, although the upper tier will have less dramatic volume or separation.
Thick or high-density hair
A dense upper tier can create more width than expected, particularly when it ends around the cheeks or jaw. A stylist may use selective internal weight removal to help it settle without cutting away the visible perimeter.
The goal is to reduce unwanted bulk without hollowing out the outline. Heavy thinning throughout both tiers can create flyaways, uneven-looking ends, or less definition than the reference shows.
Wavy or curly hair
Plan the endpoints around how the hair sits when worn naturally, not only how far it reaches when pulled straight. Different areas can spring up by different amounts.
Ask the stylist to assess the finished shape in its dry, natural fall. A curled upper tier may look rounder and shorter, while movement in the lower tier can soften the dividing line. That softer result can be intentional, but it will not create the same sharply geometric outline seen in a straightened reference.
Coily or shrinkage-prone hair
Place both tiers according to the silhouette you see when your hair is dry and worn in its usual style. Use landmarks such as the cheekbones, jaw, shoulders, or collarbone to describe where each section should appear after shrinkage.
Also discuss how the cut will look when stretched, braided out, twisted out, or heat-styled. The same two tiers can appear farther apart or closer together depending on the amount of elongation. Prioritizing the usual dry finish creates the most relevant everyday shape, but the spacing will change when the hair is worn differently.
Straight hair and added length
Straight hair often reveals blunt edges and disconnection clearly. However, a rounded cap may still need a brush or heat tool to curve inward, especially where growth patterns push the ends outward.
Extensions can add lower length or fullness, but placement, attachment coverage, texture matching, and upkeep need professional consideration. They cannot guarantee an exact match to a photo, particularly when the shorter top leaves attachment areas exposed.
Is the Jellyfish Haircut Practical for You?
Use these five questions to choose a workable version:
- Do I have enough lower length? There must be a visible difference between the upper and lower endpoints. Starting with shorter hair may mean choosing a compact version, growing the underlayer, or discussing extensions.
- Will I style two sections? If not, choose references with natural texture similar to yours rather than a sculpted cap and perfectly straight tails.
- How much reshaping am I willing to maintain? A crisp upper edge usually needs more precise upkeep than a softened one.
- How much contrast do I actually want? Look at profile and back photos. A cut that seems subtle from the front may be much bolder from behind.
- What is my grow-out plan? Keeping the two tiers and returning to blended layers require different trimming decisions.
Also consider how you wear your hair day to day. A short upper section may not reach a ponytail or bun, even when the lower tier does. Ask which pieces will remain loose and whether that works with your usual routine.
Face shape is an optional styling consideration, not a suitability rule. An upper edge near the cheekbones can emphasize width higher on the face, while a jaw-level edge draws attention lower. A curved-under chin-length tier frames the lower face differently from an outward-flipped one.
Your texture, preferred silhouette, and willingness to style the cut matter more than fitting a face-shape category.
How to Ask Your Stylist for a Jellyfish Haircut
Bring reference photos showing front, profile, and back views. Then describe these six decisions:
- Desired upper length: “I want the top section to finish near my chin when dry.” State the endpoint in your usual texture, especially if your hair shrinks.
- Lower length: Identify what should remain, such as collarbone or chest length. Say whether fullness matters more than preserving every bit of length.
- Contrast level: Choose subtle, classic, or editorial. Explicitly say whether you want the tiers to stay visibly disconnected.
- Front treatment: Discuss a rounded frame, shorter face-framing pieces, a fringe, or an open front. A fringe is optional.
- Back shape: Confirm whether the upper tier should form a complete bob-like outline or become softer behind the ears.
- Preferred styling finish: Show whether you expect curved-under, sleek, textured, or naturally air-dried hair.
A useful request might sound like this:
“I want a chin-length, bob-like upper section with a clear break above the longer underlayer. Please preserve fullness through the chest-length ends. I prefer a softly finished edge, not layers that connect the two levels, and I’ll usually wear my natural wave.”
Check what the reference photo actually shows
Before relying on an image, compare:
- Density: Is the model’s lower section fuller than yours?
- Natural texture: Is that smooth finish natural, blow-dried, or straightened?
- Starting length: Do you have enough hair to create both endpoints?
- Styling: Is the top curled under or lifted away from the head?
- Visibility: Can you see the side and back, or only the front?
- Added effects: Could extensions, color contrast, or editing be emphasizing the separation?
Camera angle, lighting, cropping, and hidden sections can change how substantial each tier appears. Photos communicate direction, but they do not guarantee an identical result. You can also use Facefy’s Hair Style Try-On to preview different hairstyle silhouettes before your appointment. Compare upper-tier length, face framing, and overall contrast, keeping in mind that virtual results are approximations.
How to Style the Two Separate Tiers
Start by separating the upper section from the lower one with clips. This makes it easier to control the finish without repeatedly brushing or heating the same hair.
Polished: smooth both levels
Apply heat protectant according to its directions. Dry the lower section first, directing airflow from roots toward ends, then smooth the upper section.
Keep the upper edge visible instead of brushing both tiers into one continuous shape. Use a small amount of finishing product on the ends only if needed.
Curved-under: round the top and keep the bottom straighter
Work through the upper tier in manageable sections with a round brush, turning the ends inward. Leave the underlayer straighter for a stronger contrast.
If using a flat iron, a gentle inward turn near the upper ends can create the curve. Use the lowest temperature that achieves the finish and avoid repeated passes. Flat irons should be used on dry hair.
Textured: separate the ends without making them stiff
For straight or wavy hair, spread a small amount of lightweight styling cream or paste between your hands, then touch it through selected ends.
Focus on movement rather than coating every strand. On fine hair, heavy application can collapse the cap or make the long section look stringy.
Air-dried: arrange each tier around its natural pattern
Clip or loosely separate the upper tier from the underlayer while the hair is damp. Arrange the lower section first, then position the upper tier so its endpoint remains visible instead of merging into the longer hair.
For fine hair or hair that becomes weighed down easily, use little or no leave-in near the upper roots. Apply a lightweight product mainly through the ends, then avoid handling the hair while it dries.
For curls or coils that need more definition, apply a curl cream, foam, or gel section by section according to the product directions. Shape the upper tier separately from the underlayer so both patterns can form without being pulled into one continuous mass.
Wait until the hair is fully dry before judging the placement. Curl formation and shrinkage can lift the upper edge above its damp position and change the apparent gap between the tiers. If the endpoint consistently dries higher than intended, discuss that observation at the next salon visit rather than trimming it while wet at home.
If these styling demands make you unsure about the direction, Facefy’s Hairstyle Finder offers an optional way to explore hairstyle ideas before committing. Treat suggestions as starting points, then discuss your preferred length, contrast, and daily routine with your stylist.
Maintenance and Two Realistic Grow-Out Routes
Maintenance depends on the upper-tier endpoint, edge sharpness, hair growth, natural texture, and how much change you are comfortable seeing. Instead of following a universal schedule, look for visible changes in the structure.
Consider booking a reshaping appointment when:
- The upper edge has moved beyond its chosen cheekbone, jaw, chin, or shoulder landmark.
- The two tiers no longer look clearly separate when styled in your usual way.
- The upper perimeter has become uneven or lost its intended rounded outline.
- The lower perimeter looks too sparse, tapered, or uneven for the silhouette you want.
- The upper section has gained enough weight that it collapses instead of holding its intended shape.
- You need noticeably more styling effort to recreate the original separation.
Route 1: preserve the two tiers
Have the upper and lower sections assessed and trimmed separately. The upper trim restores the cap’s endpoint and perimeter, while the lower trim maintains the long section’s shape and fullness.
Expected visual change: the haircut stays clearly two-level and graphic, even if you gradually lengthen the underlayer.
Avoid automatically adding connecting layers at each appointment if your goal is to keep the disconnection.
Route 2: gradually blend the tiers
Allow the upper section to gain length while a stylist introduces carefully placed connecting layers. Depending on the size of the gap, this may also involve shortening some of the lower length.
Expected visual change: the visible shelf softens, the short-to-long transition becomes more continuous, and the haircut moves toward a conventional layered shape.
Connecting layers cannot instantly replace missing length. A large gap may require patience, a shorter overall cut, or a combination of both.
Curl shrinkage, humidity, and changes in styling can make the separation appear stronger or weaker between appointments. Avoid aggressively recutting the tiers yourself, especially across the back, where judging the line and hair distribution is difficult.
Common Mistakes That Change the Intended Shape
- Asking only for “lots of layers.” This can produce a connected shag or wolf-style cut. Say that you want a visible break between the two sections.
- Taking too much fullness from the lower tier. Decide how substantial the long section should look before allocating hair to the cap.
- Choosing the upper endpoint from a heat-styled photo. Account for natural lift and shrinkage so the dry result does not sit higher than you intended.
- Ignoring the back view. Confirm whether the short section wraps around the head or mainly frames the face.
- Using too much product. Start lightly and add only where needed. Definition does not require saturating the ends.
- Expecting one photo to predict the result. Density, texture, existing layers, color, extensions, and styling all influence the silhouette.