Drop Fade Guide: Variations, Barber Instructions, and Upkeep
Learn what defines a drop fade, compare low, mid, high and skin finishes, and get clear barber instructions, photo tips, and upkeep advice.
A drop fade follows a curved path that dips lower behind the ear toward the nape instead of continuing at one level around the head. The “drop” describes the shape of the blend, not how short the hair must be.
You can combine low, mid, or high placement with a skin, zero, or darker shadow finish. The right combination depends on how much contrast and scalp exposure you want, how the top should connect to the sides, and how often you want to refresh the cut.
What makes a drop fade different
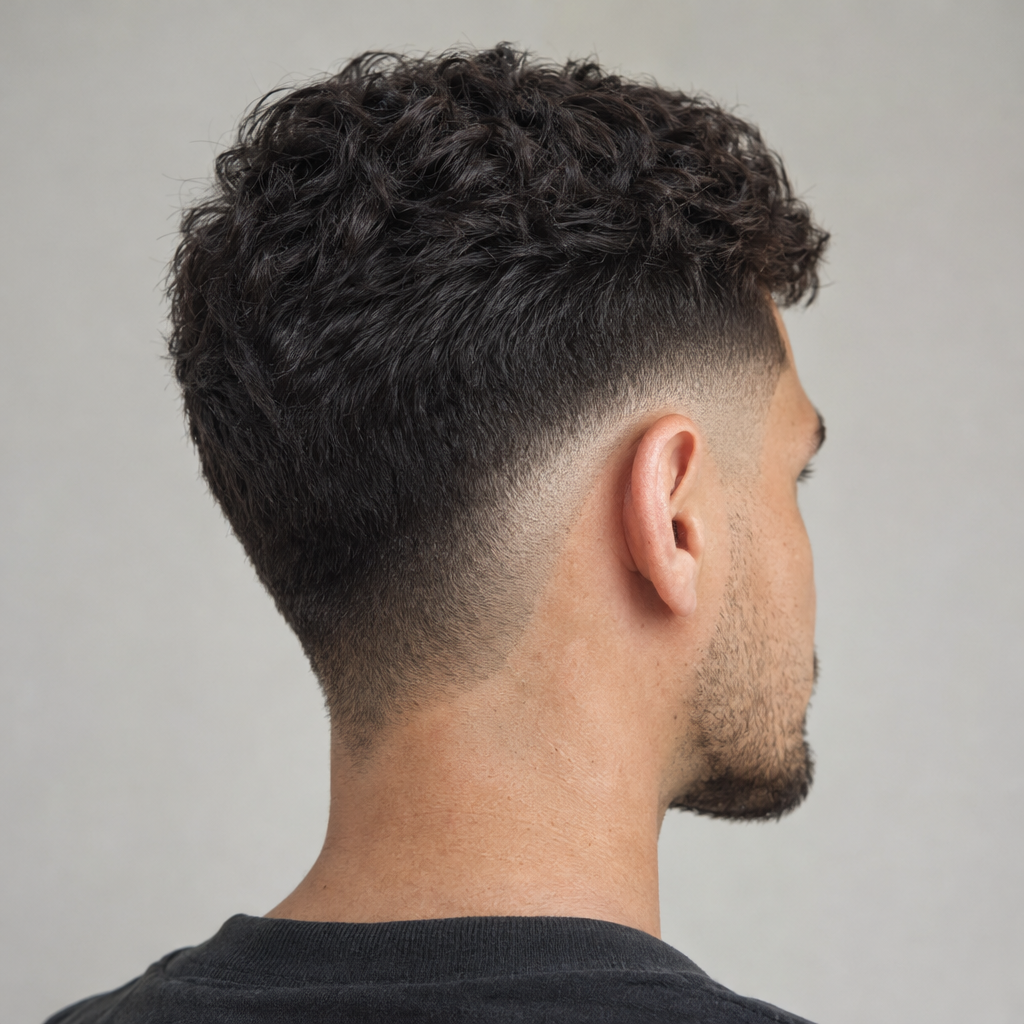
The defining feature is easiest to see from the side or rear three-quarter view. The fade sits higher at the sides, then descends behind the ears. This often preserves more hair over the back of the head than a similarly positioned fade that stays level.
“Fade line” is shorthand for the path of the transition. A finished blend should not necessarily have a visible hard line.
| Fade type | Transition path | Rear coverage |
|---|---|---|
| Drop fade | Descends behind the ears | More coverage above the dip |
| Conventional fade | Usually remains more level around the head | More even transition height |
| Taper fade | Concentrated at the temples and neckline | Most back coverage remains |
| Burst fade | Curves closely around the ear | Often preserves substantial back length |
A taper generally confines the closest cutting to smaller areas around the sideburns and neckline. Barber terminology varies, however, so “taper fade” can mean slightly different things in different shops.
The ear-centered version concentrates its blend in a semicircle around the ear. A drop fade instead describes a transition that descends toward the back. These ideas can overlap in an individual haircut, which is why a rear view often communicates more than the name alone.
Low, mid, and high drop fades compared
Placement determines how far the faded area extends up the sides. It also changes how much darker hair remains between the fade and the top.
| Placement and starting area | Dip behind the ear | Contrast and visibility preference |
|---|---|---|
| Low: near the ears and lower sides | Descends toward the lower nape | Restrained, with darker-looking sides |
| Mid: around the middle of the sides | Drops below the side transition | Noticeable, with a clearly curved blend |
| High: near the upper sides | Falls from a higher starting point | Stronger separation and more prominent faded sides |
Low placement retains more darkness around the temples and upper sides. Ask where the barber plans to leave weight, especially above and behind the ears.
Mid placement gives the curved path more visibility without necessarily bringing the blend close to the top.
High placement creates a larger faded area, but “high” refers to where the transition begins at the sides. It does not always mean the curve will descend as low at the back as it would in a low version.
These positions are approximate rather than standardized measurements. Ask the barber to indicate the proposed height on your head. Head contours, hair density, and the selected finish can all change how dramatic the same placement looks.
Fade placement and shortest length are separate choices
A low drop fade can expose skin. A high drop fade can retain visible hair. Height and closeness are independent instructions.
- Skin or bald finish: The base is taken down to exposed skin, creating a pronounced transition into darker hair above.
- Zero finish: This usually means very close clipper work with little visible length. It is not a universal measurement, and some barbers use the term interchangeably with a skin finish.
- Shadow finish: Visible hair remains at the base, creating a darker and softer-looking transition. The exact length varies.
You could request a low drop fade with a skin finish for a narrow but sharply contrasted faded area. The same low placement with a shadow finish keeps more darkness around the ears and nape.
Describe the visible result as well as using a haircut label. “I want visible hair at the shortest point” is clearer than “not too short.” If scalp coverage matters, say so directly. Even a longer base may reveal scalp where hair is less dense or contrasts strongly with skin.
How hair texture and the top change the result
The fade does not dictate the hairstyle above it. Top length, texture, and the connection into the sides determine much of the overall silhouette.
Straight and wavy hair
Straight hair can make changes in weight and blending easier to see. A heavy ledge above the fade may look intentional in a disconnected style but abrupt when you wanted a gradual transition.
Wavy hair benefits from enough retained length for the wave to bend. Cutting the transition too short may leave some sections projecting outward instead of settling into the intended shape.
For styling, begin with a small amount of product. A lightweight cream can support movement, while matte paste can add separation when you want more definition. Heavy application may flatten the top or cause sections to clump together.
Curly and coily hair
Curly and coily textures can create pronounced contrast between close sides and a fuller top. Ask the barber to assess the outline in its usual dry state because stretched or damp length does not show how high the hair will sit after shrinkage.
Preserve enough length around the upper sides for the intended curl shape. Removing too much in this area can change the silhouette more than shortening the top.
If you are comparing top shapes for curly or coily hair, Facefy’s Hairstyle Finder can help you explore different directions before discussing what is practical for your texture, density, and routine. A preview is a planning aid rather than a guarantee of the finished haircut.
Connected versus disconnected tops
A connected top transitions gradually into the sides. A disconnected top retains a more abrupt change in length, sometimes with longer hair hanging over the faded area.
Longer tops often create stronger separation, while shorter tops can produce a more continuous outline. Neither result is automatic. A careful blend can connect substantial top length to short sides, and a shorter top can still be deliberately disconnected.
Disconnection and a drop fade describe different aspects of a haircut. Disconnection refers to the length relationship between the top and sides, while a drop fade describes the path of the blend. The two can appear together in the same cut.
Across all textures, density, growth direction, and hair-to-scalp contrast affect how light or dark the fade appears.
Choose the contrast and silhouette you actually want
Use these five questions to narrow your request:
- Should the curve be subtle or obvious? Start with low placement for restraint, or consider mid or high placement for greater visibility.
- Do you want exposed skin? Choose the shortest finish separately from the fade height.
- Where should darkness remain? Point out the temples, the area above the ears, and the back of the head.
- Should the top flow into the sides? Ask for a connected transition or a deliberate length break.
- What upkeep fits your routine? Decide whether you value a freshly defined finish or prefer a softer grow-out.
Consider school or workplace requirements where relevant, particularly any rules concerning exposed scalp or strong disconnection.
Rather than relying on rigid face-shape rules, focus on the outline you prefer from the front, side, and back. Head contours, density, growth patterns, and daily styling habits often affect the result more directly than a general category. If you’re curious about your facial proportions, Facefy’s Face Shape Detector can provide a photo-based estimate to help you explore how different drop fade heights and top volumes might frame your face.
Four details that can change how the fade turns out
These are normal characteristics to plan around, not problems that the haircut needs to correct.
1. A prominent occipital area
The occipital area is the rear contour of the skull. A pronounced curve can make retained hair form a heavier-looking band above the fade.
Ask: “How will the drop follow the back of my head, and where should we keep or remove weight?”
The answer may involve adjusting the blend rather than simply taking the entire fade higher.
2. Low density or strong scalp contrast
The same clipper length can look darker on dense hair and lighter where coverage is lower. Strong contrast between hair and skin can make this difference more noticeable.
Ask: “Would a shadow finish or longer base keep the amount of coverage I want?”
Leaving more length may help, but it cannot guarantee that the scalp will be completely concealed.
3. A crown or neckline cowlick
A growth swirl can lift away from the intended shape when cut too short. At the neckline, growth direction may also affect how neatly an imposed outline grows back.
Ask: “How much length needs to remain here for control, and should the neckline follow the natural growth?”
4. Uneven growth around the ears
Hair may grow flatter, denser, or in a different direction on one side. Identical clipper settings do not always produce an identical visual result.
Ask: “Can you adjust each side to make the blend look balanced rather than using exactly the same approach?”
What to ask your barber for
Build the request from five details:
- Fade height: Specify low, mid, or high, then point to the intended upper boundary.
- Shortest length: Choose exposed skin, a nearly bare clipper length, or a visible shadow.
- Shape behind the ear: Request a curve that descends toward the nape rather than staying level or closely circling the ear.
- Top treatment: State the desired length, texture, and whether you want a connected or disconnected transition.
- Neckline: Discuss a natural taper, rounded outline, or squared outline where compatible with the finish and growth pattern.
A complete request could sound like this:
“I would like a low drop fade that curves behind the ear toward the nape, with a dark shadow at the shortest point. Keep the top textured and connected, and finish the neckline with a natural taper.”
Add an actual length instruction for the top, such as “remove about half an inch” or “keep enough length to sweep backward.” The word “textured” describes the finish, not how much hair should be removed.
A skin finish at the lower nape may leave little visible neckline to shape. Ask which neckline choices remain meaningful for the version you select.
Before cutting begins, ask the barber to point out three positions: where the fade will start, where it will dip behind the ear, and where it will meet the neckline. This quick check can reveal differences in terminology before any length is removed.
How to choose a useful reference photo
Bring at least two views: a clear side view and a back or rear three-quarter view. One front-facing image rarely shows the defining drop.
Use this checklist:
- Side view: Can you see the fade height and curve behind the ear?
- Rear view: Can you see how far the transition drops and how the neckline ends?
- Top: Does the image show the length and connection you actually want?
- Texture and density: Is the model’s hair broadly comparable to yours?
- Base: Does the photo show your preferred amount of exposed skin or retained darkness?
- Styling: Would you be willing to style the top that way regularly?
You can combine references, but explain the division clearly: “This photo for the fade, and this one for the top.”
If you use a hairstyle preview while planning the top, compare the broad outline and length rather than expecting every strand or transition to match. Lighting, camera angle, image quality, and your starting haircut can affect how a preview appears. Facefy’s Hair Style Try-On can help you preview different haircut options before your appointment, giving you a visual reference for discussing top length, volume, and overall shape with your barber.
Reference photos have similar limitations. Wet hair, styling products, camera processing, and editing may change the apparent density and sharpness of a blend. A reference communicates direction, but it cannot guarantee an identical result on a different head of hair.
How a drop fade grows out and when to refresh it
A skin finish usually loses its freshly exposed appearance sooner because short new growth becomes visible in the previously bare area. A shadow finish starts darker, so the change can appear more gradual.
As either version grows:
- The curved transition becomes less distinct.
- Weight builds around the sides and back.
- The neckline becomes softer or less defined.
- A longer top may begin to overhang the transition.
For scheduling, roughly one to two weeks may suit someone who wants to maintain a very crisp skin finish. Around three to four weeks, and sometimes longer, may suit someone comfortable with a softer blend. These are planning ranges rather than fixed lifespans.
Growth rate, starting length, scalp contrast, and personal preference matter more than the calendar. The haircut can remain wearable well after its sharpest stage.
A neckline or edge cleanup can improve neatness between full cuts, but it does not restore the complete blend. Avoid chasing the fade higher with home touch-ups. Removing extra hair changes the curved path and leaves the barber with less room to rebuild the intended shape at your next appointment.