Hush Cut Guide: Layers, Variations, Styling, and Salon Requests
Learn what defines a hush cut, how it compares with layered styles, how to adapt it to your hair, and what to request at the salon.
A hush cut is a soft, airy layered haircut associated with Korean salon trends. Its recognizable features include graduated face-framing pieces, softly blended internal layers, tapered or feathered ends, and an optional wispy fringe. Compared with a wolf cut or shag, it usually has less contrast between layer lengths and a more understated outline.
The name does not refer to one fixed cutting formula. One stylist’s version may be long and lightly feathered, while another may have noticeable crown layers and bangs. To get the result you want, describe the front-piece length, crown layering, bottom edge, and fringe instead of relying on the label alone.
What a hush cut looks like
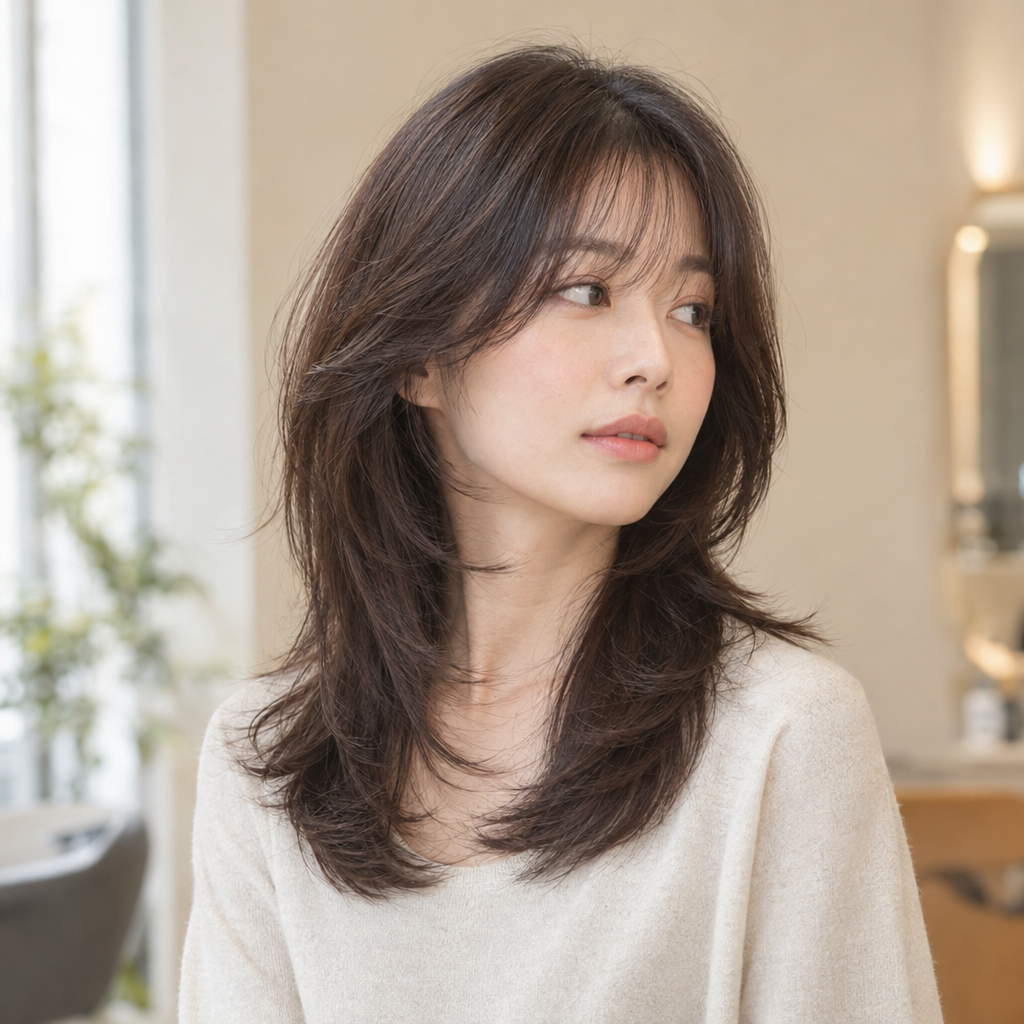
Look for these five features together rather than treating any one of them as essential:
- An airy silhouette. The hair has movement and lightness instead of reading as one solid block. Airy does not have to mean thin or see-through.
- Graduated face-framing pieces. Shorter sections around the face progressively connect to the longer lengths. Their placement can draw attention toward the cheekbones, mouth, jawline, or neckline.
- Softly blended internal layers. Different lengths within the haircut create movement without an abrupt shelf between the upper and lower sections.
- Tapered or feathered ends. The tips look lighter and less blunt, although a fuller bottom edge can remain underneath.
- An optional light fringe. Wispy bangs are common, but longer curtain-style pieces or an open forehead can fit the same overall design.
The perimeter is the haircut’s bottom outline. Its fullness matters. A hush cut with a substantial perimeter looks denser and quieter, while a heavily tapered perimeter creates more visible separation through the ends.
Although the style is associated with Korean salon and beauty trends, it should not be treated as one standardized technique. Reference photos and precise descriptions are more useful than the trend name alone.
How length and fringe change the result
Length affects how gradually the layers can connect. Fringe determines how much hair sits across or beside the forehead.
| Length | Visible effect | Main trade-off |
|---|---|---|
| Short, above the shoulders | More apparent layer structure | Less room for gradual transitions |
| Medium, around the shoulders | Movement with connected front pieces | Shoulder contact may flip the ends |
| Long, below the shoulders | Retained length with softer movement | Subtle layers may need styling to show clearly |
On a shorter version, even a modest difference between layer lengths can look pronounced. Keeping the crown relatively long helps preserve a quieter silhouette.
Medium lengths provide room for the front pieces to blend into the sides. At shoulder level, however, the ends may turn outward where they meet clothing or the shoulders. That movement can complement the cut, but it may not match a smooth reference image.
Long versions preserve the most overall length. Their layers can be less obvious when the hair falls straight, especially without a blowout or natural wave pattern.
Choose the front separately
- Wispy bangs: Provide light forehead coverage and a delicate finish. They may need trimming or styling before the rest of the cut does.
- Curtain-style pieces: Open away from the center and blend into the side layers. Their outward sweep may require directional blow-drying.
- No fringe: Longer front pieces can begin near the cheek, jaw, or collarbone, providing framing without covering the forehead.
Cheek-level pieces place visible movement higher around the face, but they are more likely to fall out of a ponytail or low bun. Collarbone-level pieces place the movement lower and usually leave more length available for securing. The practical difference depends on texture, shrinkage, density, and where you position the tie-back.
Face shape and facial proportions can help you think about placement, but they should not become rigid rules. Decide what you want to emphasize, how much coverage feels comfortable, and whether the front pieces need to tuck behind your ears.
Hush cut vs. wolf, shag, butterfly, and octopus cuts
These haircut names overlap. The useful distinction is how weight and different lengths are distributed, not whether a salon uses the supposedly correct label.
| Haircut | Crown volume | Layer-length contrast | Perimeter fullness | Fringe treatment |
|---|---|---|---|---|
| Hush | Usually restrained | Low to moderate | Adaptable, often softly preserved | Optional light fringe |
| Wolf | Often pronounced | Moderate to high | Frequently thinner through the lower lengths | Common but not required |
| Shag | Variable, often lifted | Visible throughout | Commonly broken up or wispy | Often integral to the shape |
| Butterfly | Often styled for lift | Distinct upper and lower tiers | Long lower lengths are usually retained | Often features long, sweeping front pieces |
| Octopus cut | Rounded, fuller upper section | Strong upper-to-lower separation | Narrower or separated lower tendrils | Variable, usually supporting the rounded top |
A hush cut generally occupies the subtler end of this range. If your reference has very short crown layers above narrow, separated lower lengths, the construction may be closer to a wolf or octopus cut regardless of its caption.
Four questions to ask before choosing the cut
Use this self-check with your favorite reference photo:
- Does the reference depend on a blowout? Look for consistent root lift, smooth surfaces, and ends curving in the same direction. Separate the haircut itself from the styled finish.
- Does the model’s density resemble yours? Compare visible fullness through the sides and bottom edge. Lighting, extensions, hair placement, and image editing can make this difficult to judge.
- Are you comfortable with pieces falling around your face? Cheek-length sections may not stay behind your ears or reach your usual hair tie.
- Do you want visible separation or a subtle blend? Decide whether you prefer distinct tiers or movement that becomes noticeable mainly when the hair moves.
If you like the photograph but dislike daily styling, loose front pieces, or separated ends, ask for a restrained adaptation rather than an exact copy.
An air-dried version may look flatter, curlier, less feathered, or less evenly separated. That reflects the difference between your natural hair behavior and the finish shown in the image.
How to adapt a hush cut to your texture and density
Texture, strand thickness, and density are different characteristics. Straight hair can be dense, while curly hair can have fine strands. Tell your stylist about both your pattern and the amount of hair through the lengths.
| Hair characteristic | Useful adaptation | Main limitation |
|---|---|---|
| Straight | Subtle internal layers and softened tips | Curved ends may need styling |
| Wavy | Place layers around the natural bends | The pattern may vary across sections |
| Curly or coily | Set face framing according to the dry shape | Shrinkage changes the visible length |
| Fine or low-density | Preserve a stronger bottom edge | Heavy layering can expose gaps |
| Thick or high-density | Remove weight selectively | Excessive thinning can disrupt the outline |
Straight and wavy textures
Straight hair often shows the layer blend clearly, so abrupt transitions can be especially noticeable. Start with restrained internal layering if you want a soft result. Hair that resists holding a bend may read as a subtle layered cut rather than the curved, feathered finish commonly shown online.
With wavy hair, layer placement should account for where the hair naturally bends. A front piece cut at the wrong point in a wave can spring outward instead of sweeping back. Ask your stylist to assess the framing in your usual part and natural finish.
Curly and coily textures
Choose front-piece lengths according to where they should sit when dry, not how far they reach when stretched. Different areas may shrink by different amounts, so the front, sides, and crown need separate consideration.
When comparing hairstyle options for curly and coily textures, focus on the overall outline and volume distribution. A straight, feathered reference cannot show how your curl groupings will sit. The same soft-layering idea may produce a rounder or more sculpted result on curls and coils.
Fine, low-density, and thick hair
On fine strands or lower-density hair, preserving enough length at the bottom helps the edge look intentional. Limited face framing may provide movement without extensive layering throughout the cut.
Thick hair can benefit from targeted weight removal, but “thin it out everywhere” is not a precise request. Identify where the hair feels bulky and ask how the stylist plans to reduce that weight. Excessive thinning can leave disconnected ends or make some textures expand more readily.
Existing haircuts that may change the plan
Your starting point determines how much of the desired shape is possible at the next appointment.
Blunt, one-length hair
Dramatic short layers require cutting hair that currently contributes to the bottom edge. You cannot preserve all of that fullness while also creating substantial layering in the same areas.
For a gentler first step, retain the back outline, introduce longer face framing, and use minimal internal layering. You can add more contrast at a later appointment.
Previously over-layered or thinned ends
More layering cannot restore missing fullness at the bottom. The plan may involve growing the shorter sections while gradually trimming the longest, sparsest ends.
Ask your stylist to distinguish between reshaping the current outline and building toward a fuller future outline. Those goals may require different appointments and priorities.
Curls or strong waves with different dry lengths
Arrive with your natural pattern visible when practical, and explain how you normally dry and style it. Wet or stretched hair can conceal how high the front pieces will sit after drying.
Previous lightening, visible breakage, and existing short sections can also interrupt the outline. Your stylist should account for those areas instead of cutting every section to match an idealized reference.
How to ask your stylist for a hush cut
Use this script, replacing the brackets with your preferences:
“I want a softly blended layered cut with an airy finish. I would like the shortest face-framing piece to fall around [chosen landmark] when dry, [minimal, moderate, or noticeable] crown layering, and a [full or tapered] bottom perimeter. For the front, I want [wispy bangs, curtain pieces, or no fringe].”
Make these four decisions concrete:
- Front-piece placement: Point to the cheekbone, jaw, or collarbone. Explain whether the pieces must tuck behind your ears or reach a hair tie.
- Crown layering: Choose subtle movement, moderate lift, or visible separation. Asking only for volume leaves too much open to interpretation.
- Bottom perimeter: Say whether you want a substantial edge or lighter, separated tips.
- Fringe: Specify the amount of forehead coverage and how the front should connect to the side layers.
If you want more layering, show where the shortest layers should begin rather than asking for “lots of layers.” Also tell your stylist about your normal part, natural texture, styling routine, and how often you tie your hair back.
If you have a cowlick around the hairline or crown, point it out before the cut begins. Its growth direction can affect where a fringe separates, how the front sits, and whether crown layers lift naturally.
Useful follow-up questions include:
- “Which parts of this photo require styling?”
- “Where will the front pieces sit after air-drying?”
- “How will you remove weight without making the bottom sparse?”
- “Would a razor or thinning shears suit my texture, or would another approach preserve the outline better?”
No single cutting tool defines a hush cut. The method should serve the desired shape and your hair’s behavior.
Use three reference photos, not one front view
Bring three views, with a different job for each:
- Front: Show the desired fringe, forehead coverage, and starting point of the face framing.
- Side: Show how quickly the front pieces transition into the longer hair and how separated the layers look.
- Back: Show the crown shape, retained fullness, and bottom perimeter.
A single front-facing photo cannot reveal the full crown layering, side connections, or density at the back edge. Ideally, use multiple views of the same haircut. If you combine different references, identify one feature from each rather than asking for three complete cuts at once.
Photos also flatten depth. Lighting, camera angle, hair placement, and styling can change how full or blended a cut appears.
Styling a hush cut
For a softer air-dried finish
If your natural texture already has movement:
- Gently blot excess water without rough rubbing.
- Apply a lightweight leave-in or styling product suited to your texture.
- Arrange the front pieces in their intended direction.
- Let the hair settle with minimal handling.
Expect less uniform feathering than you would get from a blowout. Heavy product application can weigh down fine hair and reduce visible movement.
For a curved, feathered finish
A round-brush blow-dry can emphasize the face-framing bend and turn the ends. Apply heat protectant according to its directions, work in manageable sections, and allow each section to cool before brushing it out.
Direct the front pieces away from the face if you want an open, sweeping effect. Hot tools are optional and are not required for the haircut itself.
What happens as it grows
The fringe and face frame often lose their intended placement before the back does. Shorter layers gradually become less pronounced, but the original differences in length remain unless the haircut is reshaped.
As general planning ranges, a short fringe may need attention after 3 to 6 weeks, while the overall shape may be reassessed around 8 to 12 weeks. These are not requirements. Longer front pieces, a softer outline, slower growth, and greater tolerance for grow-out can allow more time between appointments.
Is the hush cut a good match for you?
A hush cut may appeal to you if you want movement and face-framing detail without strong disconnection between the upper and lower lengths. It works best as a flexible design concept in which you choose the layer contrast, perimeter fullness, and front treatment.
A less layered option may suit your preferences better if you want a completely solid edge, no loose front pieces, or a consistent finish with very little styling.
The clearest salon brief is not simply “a hush cut.” It is softly connected layers, a chosen dry-length landmark at the front, an intentional bottom edge, and a finish that fits your normal routine. Those details give your stylist something practical to build around.
If you want another visual reference before your appointment, Facefy’s Hair Style Try-On can help you preview different hairstyle directions on your photo. Treat the result as a conversation aid rather than a prediction of how your texture, density, current layers, or daily routine will reproduce the cut.