Butterfly Cut Guide: Layers, Hair Types, Styling, and Salon Tips
Learn how a butterfly cut works, who it suits, where to place the layers, what to ask your stylist, and how much styling it needs.
A butterfly cut combines shorter face-framing and crown layers with longer layers underneath, creating movement and the appearance of volume while preserving much of the overall length. It usually works best on medium-to-long hair, but layer placement should reflect your density, natural texture, curl shrinkage, and willingness to style.
The dramatic, outward-sweeping shape in many inspiration photos comes partly from a blowout or rollers. The haircut creates the layered structure; styling determines how lifted and separated those layers look.
What Makes a Butterfly Cut Different?
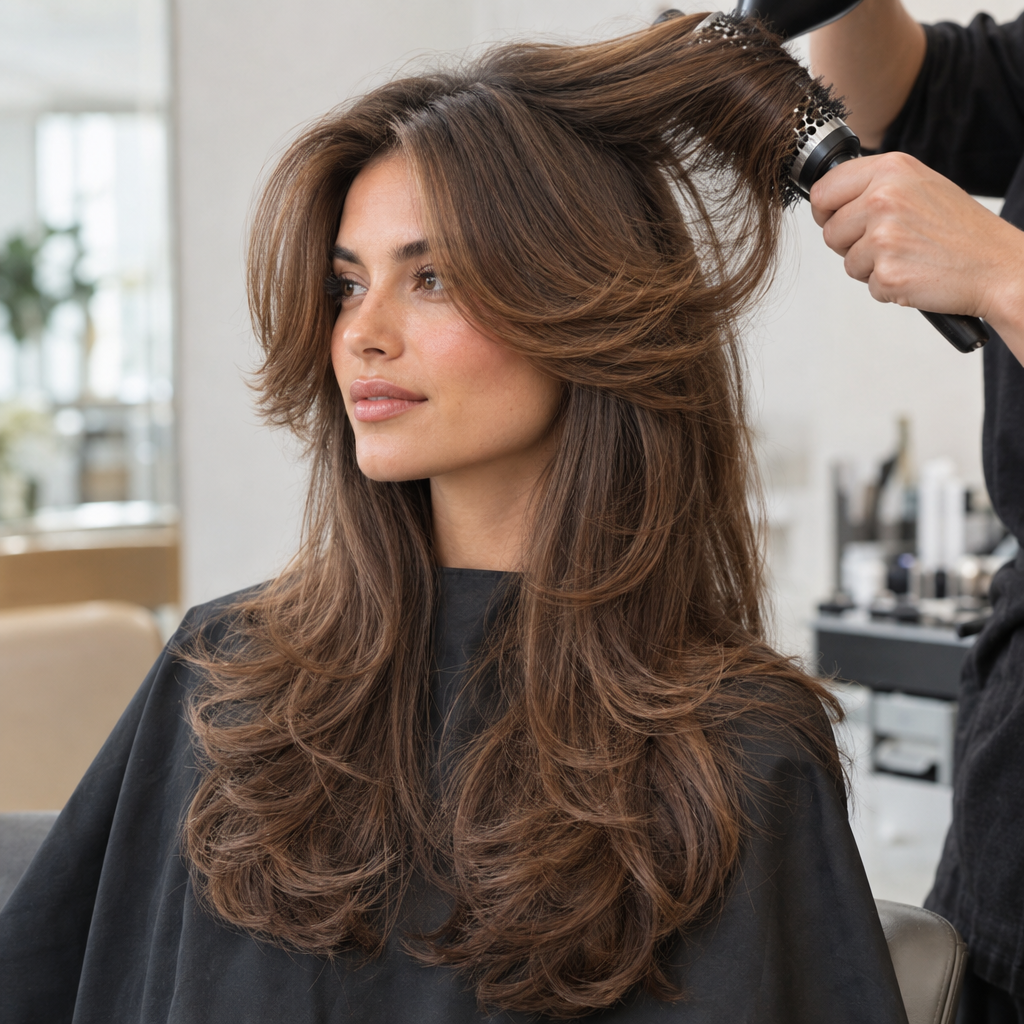
A butterfly cut has a noticeable upper section of shorter layers that blends into longer hair below. The face-framing pieces create movement around the cheeks and jaw, while crown layers can make the top feel lighter. The perimeter, meaning the bottom outline of the haircut, retains the longer silhouette.
The transition matters. Short and long sections should connect rather than forming a shelf that looks like two separate haircuts. How pronounced that contrast becomes depends on the shortest layers, the length underneath, and the finish.
Many versions have a 1970s-inspired blowout with lifted roots and ends swept away from the face. A softer, less sculpted finish is also possible. Bangs are optional, and their shortest point should be planned separately from the longer face-framing pieces.
Is a Butterfly Cut a Good Match for Your Hair?
Current length changes how much contrast you can comfortably create. On shoulder-length hair, longer crown layers and restrained face framing usually leave enough hair to connect smoothly to the ends. Cutting the crown very short can create an abrupt gap above a relatively compact perimeter. With chest-length hair, there is more room for intermediate layers between a shorter crown section and the long baseline. That allows a more pronounced butterfly shape without requiring an obvious step between sections.
Density determines how much layering the ends can support. Low-density hair generally benefits from fewer, longer layers and a stronger baseline. Dense hair may support more internal layering or targeted weight removal. Fine strands are not the same as low density: you can have many fine hairs or relatively few coarse hairs. Layering does not add actual density, and thick individual strands alone are not a reason to thin the hair aggressively.
Natural texture changes where the layers should fall. Straight hair exposes abrupt transitions, so blending is particularly important. Waves can make long, graduated layers more visible without a full blowout. Curly hair needs placement that works with the dry curl pattern rather than copying the cutting points in a straight-haired reference.
Shrinkage changes the apparent length. Curly and coily front pieces may spring well above their wet or stretched position. Agree on where they should land when dry, leaving sufficient length to accommodate that movement rather than cutting directly at the intended dry landmark.
Styling willingness affects crown length. If you usually air-dry, longer crown pieces are often easier to manage. Shorter ones can create a stronger upper shape, but may need directional drying, rollers, or deliberate curl shaping to sit as intended.
The adaptations below bring these differences together. Here, “fine” and “thick” describe individual strands; weight removal still depends on overall density.
| Hair type | Layer adaptation | Potential problem |
|---|---|---|
| Fine-straight | Use restrained layers and preserve the baseline | Excess layering can expose sparse-looking ends |
| Fine-wavy | Use long layers that follow the natural waves | Short layers may separate cohesive wave clumps |
| Thick-straight | Blend gradually and remove weight only if density calls for it | Blunt transitions can create a visible shelf |
| Thick-wavy | Retain crown length and remove bulk only from genuinely dense areas | Over-shortening can create unwanted upper fullness |
| Curly | Place layers around the dry curl pattern | Front curls may spring shorter than intended |
| Coily or high-shrinkage | Allow for shrinkage and preserve connecting length | Stretched cutting points can misrepresent the dry shape |
Where Should the Shortest Layers Begin?
These reference points describe face-framing layers, not the crown. Discuss the two areas separately.
Around the cheekbone
Cheekbone-level pieces create the strongest framing near the eyes and upper cheeks. They also produce a more distinct short upper section.
The tradeoff is control: these pieces may fall out of a ponytail, resist tucking behind the ears, or need shaping to sweep outward. Their position can change noticeably as they grow past the cheek.
Around the jaw or chin
Jaw- or chin-level layers give visible framing with a softer transition into the lengths. They can blend readily into waves and may be easier to tuck back, depending on your hairline and growth direction.
This is a useful middle ground if you want movement around the face without the commitment of much shorter pieces.
Around the collarbone
Collarbone-level framing retains more front length and fullness. It creates a subtler butterfly effect, with movement concentrated lower down rather than high around the cheeks.
It often suits someone who prioritizes tying their hair back or maintaining a fuller outline, though it will not create the same short, lifted frame as cheekbone-level layers.
Crown length needs its own decision. Very short crown layers can lift easily, but may also stick out or require more shaping. Your usual part, cowlicks, and dry curl pattern can all change where a layer appears to land.
The Same Cut Air-Dried, Quickly Styled, and Fully Blown Out
Air-dried: a softer, texture-led shape
On straight hair, an air-dried butterfly cut may look like softly graduated layers with relatively little crown lift. Waves can reveal more movement, while curls and coils express the shape through their natural definition and volume.
The cut does not automatically create outward-curved ends. If air-drying is your normal routine, choose a reference showing a comparable natural finish.
Quickly styled: focus on the front
For a modest change with less hands-on work, shape just the face-framing pieces. A brush and dryer can direct them away from the face without styling every section.
Large rollers offer another option. Setting slightly damp front pieces in heatless rollers can reduce active styling effort, but they still need time to dry and set. Less hands-on work does not necessarily mean less elapsed time. Removing rollers before the hair is dry may leave little lasting shape.
Fully blown out: lifted roots and sweeping layers
A round-brush blowout can lift the crown and curve the shorter layers outward, creating the airy silhouette associated with the cut. Rollers can help set that shape after drying; heated sections should cool before release.
For lower heat exposure, let hair become mostly dry before brush styling, use moderate heat, and avoid repeatedly passing over the same section. Heat protectant may help limit heat-related damage, but it cannot prevent all damage.
Wavy, curly, and coily hair does not need to imitate a straight blowout. Defined waves or curls can make the layered structure just as intentional.
If you find it difficult to picture a different silhouette, Facefy’s Hair Style Try-On lets you preview different hairstyles on your photo. Treat generated hair as a visual planning aid, not a prediction of how your own density, texture, or layers will behave. Lighting, angle, and the source hairstyle can also influence the impression.
What to Decide Before Your Salon Appointment
Wear your hair in its usual part so the stylist can see how the front naturally falls. Identify the shortest length you could comfortably wear when dry, including on days when you tuck it back or leave it unstyled.
Look at your ends, too. If they already lack fullness or appear uneven, ask whether a small perimeter trim and restrained layering would be more useful than removing additional internal weight. Save references with a similar natural texture and density, including at least one that is not fully blown out. A frontal photo alone may conceal disconnected layers at the sides or back.
Use these four decisions to make the request specific:
- Shortest face-framing point: Choose a dry landmark, such as the chin or collarbone. Say if those pieces must tuck behind your ears.
- Shortest crown layer: Ask the stylist to show where it will fall when dry. Specify whether easy air-drying matters more than pronounced crown lift.
- Perimeter retention: Agree on how much can come off the bottom, such as no more than 2 cm, and how full the baseline should remain.
- Degree of separation: Choose softly blended movement or a more noticeable upper section while keeping a connected transition.
For example: “I want chin-length framing when dry, longer crown layers for air-drying, and no more than 2 cm off the bottom. Keep the ends full and the transition soft.”
For curly or high-shrinkage hair, a stylist experienced in assessing the dry shape can help translate those landmarks into appropriate cutting lengths.
Butterfly Cut vs. Long Layers and a Shag
Conventional long layers usually keep the shortest pieces longer and distribute the changes in length more gradually. They are worth considering if you mainly want movement through the ends without a distinct upper section.
A butterfly cut emphasizes shorter face framing and upper layers over a retained long perimeter. Its defining contrast is between the lighter upper shape and the longer lower section.
A shag often puts more emphasis on crown layering, texture, and separation. It may have a less full or polished lower outline, although softer shags can overlap with butterfly cuts.
These labels are flexible. Fringe, perimeter shape, and styling can make two similarly named cuts look quite different. If none quite matches your goal, explore hairstyle ideas beyond the butterfly cut and compare the actual layer placement rather than the name alone.
Maintenance and Common Butterfly Cut Problems
Reshaping becomes useful when the front no longer frames the point you chose, the crown loses its intended shape, or the ends need tidying. There is no universal schedule: starting length, growth rate, texture, and preferred finish all affect when that happens.
Four problems are particularly worth discussing with your stylist:
- Front pieces cut too short: Prevent this by agreeing on the shortest acceptable dry length, allowing for curl shrinkage. If it happens, a stylist may soften the surrounding transition, but restoring the missing length requires growth.
- Shelf-like disconnection: An abrupt ledge between upper and lower sections usually needs a more gradual connection. A stylist may be able to blend that transition without shortening the entire perimeter.
- Over-thinned ends: Preserve a stronger baseline and avoid automatic thinning simply because the strands are thick. Once too much fullness is removed, rebuilding it generally takes growth, restrained future layering, and gradual trimming.
- Crown layers that demand unexpected styling: Choose longer crown pieces if air-drying is your priority. During grow-out, light directional styling or strategic pinning may help manage pieces that do not settle naturally.
Targeted weight removal is different from thinning everywhere. In dense hair, excessive shortening can allow the upper section to expand while leaving the ends comparatively weak.
At-home ponytail cutting methods offer limited control over these relationships. The front, crown, and perimeter need to remain connected across different cutting angles, so a single shortcut can produce uneven framing or an unexpectedly large gap between layers.
Butterfly Cut Questions
Does a butterfly cut remove much length?
It can preserve most of the bottom length, but it still removes length from the front and upper sections. “Keep my length” is therefore not a complete instruction: specify both the amount allowed off the perimeter and the shortest acceptable layers.
Can a butterfly cut work on short hair?
It can be adapted, but there is less room between the crown and the ends to create the characteristic short-over-long silhouette. On a bob or shorter shoulder-length cut, the result may read as a compact layered haircut rather than a long butterfly cut. Keeping the crown layers longer can help preserve a connected outline while adding face-framing movement.